In 99 nights, the forest tightens its grip: every click of a branch echoes with corruption, and the path you choose may redefine you.
How to Play Hard Mode in 99 Nights in the Forest
Activate Hard Mode from the main menu before launching a new game. Survive 99 nights while corruption spreads faster, draining health and twisting the forest into deadlier zones. Prioritize fire sources and elevated camps to slow corruption buildup. Stockpile anti-corruption items like purified water early, as tainted resources corrupt inventory slots over time. Scout safe paths during daylight to evade amplified night spawns and boss variants.
You can start the Hard Mode in 99 Nights in the Forest from the Research Outpost. After starting the game, you can find the Research Outpost by navigating using the map. Once you’ve found the outpost, go inside it. On your left side, you’ll notice a steel door. Open it and go downstairs to find a basement.


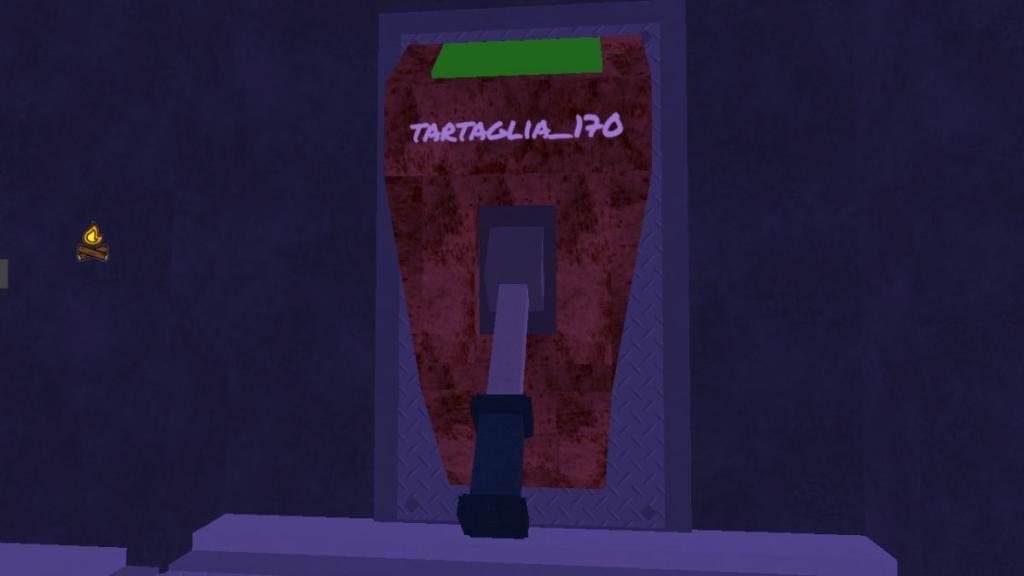
The basement contains the main root of the corruption, which starts the hard mode. In the basement, there will be a single lever or multiple levers, depending on the number of players in the round. Once you or your group has pulled the level, the hard mode will be enabled. However, it can only be started after reaching Day 3.
You can access the Research Outpost from Day 1, but the Hard Mode doesn’t start until you’ve reached Day 3. After Day 3, the Hard Mode will start, followed by a cutscene, and you can check the debuff status on the screen of the Research Outpost. You’ll also find rifts opening up in the map, and the corruption spreading further with each passing Day.
Also Read: 99 Nights in the Forest Codes (January 2026)
How to Control the Corruption Level in 99 Nights in the Forest
Managing corruption in 99 Nights in the Forest on Hard Mode requires constant attention to your actions and surroundings. Corruption rises with dark interactions, prolonged exposure to cursed areas, and using tainted items. To keep it low, purify regularly at safe spots, avoid unnecessary fights with shadow creatures, and use cleansing potions strategically. Keeping your corruption level balanced not only preserves your sanity meter but also prevents hostile transformations that can make later nights far more dangerous.
The Corruption Level indicates the difficulty of the Hard Mode in 99 Nights in the Forest. The Corruption Level increases as you move forward with the game and survive more days. However, your goal is to keep the level as low as possible by surviving the nights. This can only be done if all the Debuff Statuses are in control.
Currently, there are four Debuff Statuses in the game:
- Hungry Deer
- Passive Heals
- Cultist Waves
- Food Rot Spores

You can keep them minimal by checking out the Corrupted Rifts that have opened up. Your goal is to kill the infected animals and chop down the corrupted trees. This will keep the corruption level low and help you survive longer.
Hard Mode Tips and Tricks for 99 Nights in the Forest
Tactics for 99 Nights in the Forest’s hard mode emphasize conserving resources, timing corruption mechanics, and prioritizing safe routes. Plan escapes with retreat paths, stack versatile gear, and use environment tricks to outsmart creatures. Focus on steady progress over risky bravado, and keep a mental map of safe havens to survive each grueling night.
As discussed, your main goal is to prevent the corruption from spreading in the forest by fighting back the corrupted elements near rifts. Here are some tips and tricks that will help you survive the Hard Mode:
- When the Hard Mode has started, make sure to open the chests inside the Research Outpost. They give a Research Monitor Blueprint, Bandages, MRE, and a Medkit. These are useful items used to revive players in the game.
- Explore the forest from time to time whenever there’s a new corrupted rift spawn.
- Kill the corrupted animals and chop the corrupted trees as soon as possible to reduce the corruption.

- You must avoid the debuffs at all costs. As the corruption level increases, more debuffs will be applied, and the final one creates spores on your food, making it inedible. You can’t consume Food with Rot Spores, and eventually you will die of hunger.
- Make sure to equip yourself with the best 99 Nights in the Forest class.
- Aim to survive 50 Days and 99 Days for a double diamond reward.
Best classes for Hard Mode survival
For Hard Mode in 99 Nights in the Forest, the best classes are the ones that either keep you alive through sustain/defense or massively reduce pressure on the camp over many nights.
Overall best picks
For pure Hard Mode survival (especially in duo or squad), you generally want:
-
1-2 high-impact combat carries that scale into late game.
-
1-2 support/economy classes that keep food, armor, and structures flowing.
From current community tier lists and discussion focused on Hard Mode, the most consistently recommended classes are:
-
Cyborg (top all-rounder DPS/survivor)
-
Necromancer / Beastmaster / Zookeeper (minion-heavy “safe” damage and raid control)
-
Cook/Chef (strong healing food, huge in “no natural regen” debuff)
-
Blacksmith (fast base power spike: armor, weapons, defenses)
-
Lumberjack / Base Defender (economy/defense backbone)
Solo survival (playing alone or duo)
Best solo classes lean on self-sufficiency and safe damage:
-
Cyborg – High, reliable damage from range and good tools for clearing waves, widely regarded as the safest and strongest “do everything” class for solo runs.
-
Necromancer / Beastmaster / Zookeeper – Let pets/summons tank and kill while you stay safe; they’re especially good once Hard Mode debuffs kick in because your body takes fewer risks while minions handle raids.
-
Big Game Hunter – Excellent for very long runs thanks to scaling permanent buffs, but needs you to play well early so you actually reach the late-game payoff.
If you mostly play solo and want the easiest path to your first Hard Mode clear, Cyborg is the default recommendation; pick a minion-based class only if you like managing pets and positioning.
Best classes in a 3-5 player team
In teams, the “best” setup is about synergy and resource stability more than just raw damage:
| Role | Top class options | Why they’re strong on Hard Mode |
|---|---|---|
| Main DPS carry | Cyborg, Pyromaniac, Vampire | High AoE and boss damage from range; can delete waves before they reach walls. |
| Pet/raid controller | Necromancer, Beastmaster, Zookeeper | Minions soak hits and shred cultist raids so players take less risk. |
| Healer/food sustain | Cook/Chef | Hearty stews and good food effectively replace lost passive regen. |
| Base & gear rush | Blacksmith | Speeds up weapon/armor and base fortifications before debuffs snowball. |
| Resource engine | Lumberjack, Base Defender, other econ buffs | Faster wood/defense production to keep up with stronger raids. |
A very strong 4-player template is: Cyborg + Necromancer (or Beastmaster) + Cook + Blacksmith, flexing a fifth slot as another DPS or a resource class depending on how confident your group is.
Classes to be careful with on Hard Mode
Some classes are strong on paper but much harder to pilot safely once corruption debuffs (no regen, rotting food, more dangerous raids) start stacking:
-
Melee brawlers that must sit in melee 24/7 are much riskier; several community discussions mention Brawler feeling underwhelming in Hard Mode for most players because constant close-range combat is punishing.
-
Stacking too many identical “greedy” DPS classes (like 4-5 Cyborgs) can backfire in long runs because everyone competes for the same ammo/loot and
Cyborg build guide for Hard Mode
Here’s a practical Cyborg build outline for 99 Nights in the Forest Hard Mode, focusing on safety first and damage second.
Core role and playstyle
-
Cyborg is a ranged carry / base defender: you sit on or near walls and delete raids and bosses before they reach the camp rather than running around in the open.
-
In Hard Mode, the goal is to turn Cyborg into a reliable “turret with legs”: very high sustained ranged damage, thick defenses, and enough mobility to rotate to rifts when needed.
Stat priorities
Think in three layers: stay alive, then shoot forever, then get faster.
-
Defense first
-
Max HP to survive chip and surprise bursts, especially once healing debuffs and stronger raids are active.
-
Armor/flat damage reduction so small hits don’t eat all your health.
-
Some movement speed to kite corrupted mobs and reposition on walls.
-
Sustained fire
-
Ranged damage / weapon upgrades before fancy crits; you want consistent kill speed.
-
Reload and fire-rate boosts so you can thin waves before they stack on the wall.
-
Ammo economy or energy management perks so you’re never “dry” mid-raid.
-
Utility and quality of life
-
Modest crit chance/crit damage once core damage and defenses are online.
-
Any perks that improve vision, range, or mark targets help you clear through walls safely.
If you ever have to choose, take survivability over small DPS bumps; a dead Cyborg does zero damage during long Hard Mode nights.
Recommended build path by phase
Early game (Nights 1-10)
-
Stay close to base and play safely: don’t chase every kill; let enemies come to you so you don’t eat unnecessary hits.
-
Rush basic armor and HP items first, then your primary gun upgrades (laser/energy cannon or main rifle, depending on what Cyborg uses in your run).
-
Prioritize:
-
1-2 solid armor upgrades.
-
A reliable healing source (food, bandages, or team Cook if you have one).
-
First weapon tier upgrades so you one-shot basic enemies around the camp.
-
Goal: You should feel comfortable holding a wall lane alone against standard waves before Hard Mode debuffs start stacking.
Mid game (Nights 11-40)
-
This is where Hard Mode corruption and debuffs really start to matter, so you shift into “raid anchor” mode.
-
Focus upgrades on:
-
High-tier main weapon and range improvements so you’re killing enemies far from the walls.
-
Extra magazines / ammo capacity and reload speed.
-
More HP + at least one good panic option (extra medkits, movement ability, or escape path behind walls).
-
-
Coordinate with the team:
-
Let supports (Cook, Blacksmith, Lumberjack) handle base economy.
-
You and another DPS/cc class focus on deleting rift waves and big raids fast so corruption doesn’t spike.
-
If your team has a minion class (Necromancer/Beastmaster), stand just behind their pets and laser through whatever they’re holding in place.
Late game (Nights 40+ and boss pushes)
-
At this point, treat yourself as a boss killer:
-
Cap your main weapon rarity/tier.
-
Add crit and any multiplicative damage bonuses available.
-
Finish your defensive set: big HP pool, solid armor, and reliable healing.
-
-
Positioning rules:
-
Fight from behind walls whenever possible.
-
Only step out to finish bosses or help with rifts, and always keep an escape route.
-
In very high corruption, your job is to erase high-priority targets (cultists, elites, boss units) before they can stress your supports and walls.
Team synergy and roles
Cyborg shines most in Hard Mode when paired with:
-
One minion/summoner (tank line + crowd control) so you avoid getting swarmed.
-
One economy/defense class (Blacksmith / Lumberjack / Builder) so your walls and armor stay ahead of the curve.
-
One sustain class (Cook) so you can survive reduced natural healing and longer fights.
Role breakdown in a 4-man:
-
You: primary ranged DPS and raid anchor.
-
Summoner: front line and rift scout.
-
Blacksmith: armor/weapon rush and wall upgrades.
-
Cook: food, heals, and corruption-friendly sustain.
Simple Cyborg “checklist” for Hard Mode
Use this as a quick build reminder:
-
Early: HP + armor > gun damage; stay on walls.
-
Mid: cap your main gun, boost range + reload, become a wall turret.
-
Late: add crit/multipliers and finish defenses; focus on bosses and elites.
-
Always position behind walls or pets, never tank waves in the open.
If you tell me which weapon line your Cyborg uses (laser cannon vs more conventional guns) and your team size, I can give you a short, weapon-specific upgrade path and perk order.