The Copper Golem Statue brings a spark of creativity and nostalgia to Minecraft, blending art, oxidation, and redstone mechanics into one build. Learn how to craft it, manage its changing patina, and power up your contraptions with this unique metallic companion.
The new Copper Golems will then turn into a statue when left unattended for a long time. So, if you want to know all about the copper golem statues in Minecraft, go through this guide here.
How to Get a Copper Golem Statue in Minecraft
To obtain a Copper Golem Statue in Minecraft, craft it using eight copper blocks arranged around a lightning rod in a crafting table. Place the lightning rod in the center square of the 3×3 grid, then surround it completely with copper blocks-no gaps allowed. This recipe works after the copper golem appears in snapshots or updates; apply the statue to any surface where you want a decorative, oxidizable figure that fits Redstone contraptions.
Copper Golem statues can neither be crafted nor they can be found in the open world of Minecraft. So, in order to get one, you must create a living copper golem first. So all you need is a solid copper block and a carved pumpkin.
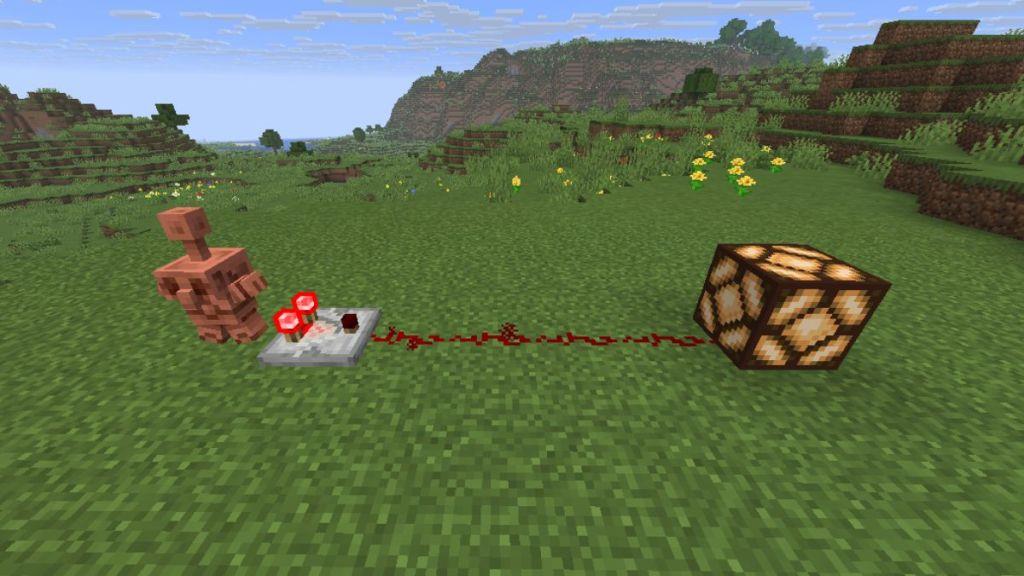
We have a detailed guide to make a copper golem in Minecraft, if you want to know more about the basic ingredients. Now, simply place the copper block on the ground and the carved pumpkin on top of it to get your copper golem and a copper chest underneath.
With the first step out of the way, you must now wait for a while to let the Copper Golem oxidize and change its color. You will then notice the copper golem slowly turning greener with an increase in its oxidative state. So, once the whole copper golem is green and is fully oxidized, there will be a 0.58% chance per tick that the golem turns into a statue.
So, it will take an average of 8.62 seconds for the fully oxidized copper golem to turn into a statue. During this transformation, if the golem is holding any item in its hand, it will get dropped to the ground, and the copper golem will have a random pose before it goes numb.
All Poses of Copper Golem Statue
The Copper Golem Statue can take a few distinct poses, each showing off its quirky charm. Some versions depict it standing straight with arms outstretched, while others capture a mid-step stance as if it’s about to press a button. Depending on how it was modeled, slight tilts of the head or arm angles can give it personality, reflecting the golem’s curious and playful nature. These pose variations make each build unique, especially when displayed alongside other copper-based creations.
The Copper Golem can have four different poses while turning into a statue, including the original standing pose, sitting pose, running pose, and star pose. If you don’t like the pose it originally had during the transformation, you can click on the statue with an empty hand to change the pose. That said, all the statue poses are displayed as below:
| Copper Golem Statue Pose | Image |
|---|---|
| Standing Pose |
|
| Sitting Pose |
|
| Running Pose |
|
| Star Pose |
|


Also Read: How to Make an Armor Stand in Minecraft
All Features of Copper Golem Statue
Copper Golem statues provide a compact, decorative centerpiece for base builds, showcasing a believable aging process as oxidation progresses. They respond to redstone signals with subtle, mechanical cues, and their copper material pairs well with other metal blocks to create striking contrast.
The Copper Golem statue is a unique addition to the game. Whether it’s about the different color variants or how it reacts with redstone components, each can help you make your base look more alive. That said, here are the two key features of the copper golem statue:
1. Oxidation States
Although the copper golem statue is formed only when the golem reaches the final oxidation state, you can manually change the states of the statue as well. All you need is a simple axe, and you can scrape the patina off a fully oxidized copper golem statue to bring back its rusty color.

Do note that with each scrape, the statue goes back one oxidation state. So, once the golem statue is fully rusty orange in color, the next scrape will bring it back to life. The change in states can also be done by redirecting lightning bolts to make them fall on the statue. Lastly, if you want to keep a certain state on the statue for the rest of the time, you can wax it using a honeycomb and lock its color.
2. Redstone Mechanism
The copper golem statues can emit redstone signals that can be detected by the comparator. Plus, the strength of signals emitted by the statue depends on its pose, explained as follows:
- Standing Pose: 1
- Sitting Pose: 2
- Running Pose: 3
- Star Pose: 4
The redstone strength means the number of redstone dust lines the signal can travel. For instance, if the statue is doing the standing pose, and a comparator is kept right next to it, it will emit a redstone signal that can travel a single redstone powder line.
This way, you can use these statues as connectors in various redstone builds, since they can generate power without the need for redstone torches or any sort of levers.
Best designs to use copper golem statues with redstone
Copper golem statues work best anywhere you need a compact, pose-based multi-step input, like locks, doors, puzzles, and “dials.”
Combination locks and keypads
-
Use one or more statues as a code input: each pose is a different “digit” read by a comparator, which then feeds into a redstone/torch logic circuit that only opens when all poses match the correct pattern.
-
This works well for secret vaults or temple-style puzzle doors, since you can hide the redstone behind walls and only expose the statues as the interface.
Pose-controlled doors
-
Place a statue next to a piston door; run the comparator output into repeaters and pistons so that only one specific pose (or range of signal strengths) opens the door.
-
Use different poses as “states” (locked, open, guest-access, etc.) by feeding the signal into a simple RS latch or T-flip-flop before it reaches the door pistons.
Puzzle rooms and adventure maps
-
Put several statues in a room and let each pose power separate redstone lines that control lamps, note blocks, or hidden trapdoors for puzzle-style progression.
-
Designers often combine statues with comparators, redstone lamps, and display blocks so players must set all statues to the correct pose to light an indicator row and unlock the next room.
Redstone “dials” and selectors
-
Treat a single statue as a 4-position selector: point its comparator into a redstone “redcoder” or decoder to route each pose to a different machine (farm on/off, different song, different item line, etc.).
-
Because all poses can be read from any side with comparators, statues are good for compact control panels where one block chooses between several outputs.
Farms and technical builds
-
Large technical setups use many statues in arrays, with comparators feeding into logic to cycle different farm modes or to select among storage outputs.
-
AFK copper statue farms can produce many pose variants automatically, letting you decorate and also wire
How to build Copper Golem combination lock step by step
Here is a simple, survival-friendly way to build a basic copper golem statue combination lock that controls a door.
What you’ll build
You will make:
-
3-4 copper golem statues as “code dials” in front of a wall
-
A comparator behind each statue, feeding into a logic line
-
A redstone torch inverter that unlocks an iron door only when all statues are in the correct pose (signal strength)
Materials (for a 3-digit lock)
-
3 copper golem statues and a way to place them
-
3 redstone comparators
-
6-10 redstone dust
-
3 redstone repeaters
-
3 redstone torches
-
Building blocks (any solid block)
-
1 iron door (or hidden piston door instead)
Step 1 – Place the statues and outputs
-
Place your 3 copper golem statues in a row in front of a wall, spaced one block apart.
-
Behind each statue, in the block directly behind it, place a solid block, then a comparator facing away from the statue so it reads the statue’s pose signal.
-
Put 1-2 redstone dust after each comparator so each statue has its own short “output line”.
Step 2 – Decide your “code” (poses)
Each statue has 4 poses with different signal strengths:
-
Standing = 1
-
Sitting = 2
-
Running = 3
-
Star = 4
Decide, for each statue, which pose is correct.
-
Example code: Statue 1 = standing (1), Statue 2 = running (3), Statue 3 = star (4).
Behind each statue’s line, count how many blocks of dust you need so only that correct pose reaches the “target” block:
-
If you want strength 1 to be correct, target block is 1 dust away.
-
Strength 2: 2 dust away, and so on.
Place a solid block at the end of each line where the correct strength should just reach and still be powered, and put a redstone torch on the side of that block (facing outward).
Step 3 – Make the “all correct” AND condition
-
Behind your 3 torch blocks, place 3 more blocks and run a line of redstone dust so that:
-
Each redstone torch powers that back line only when its own statue is correct.
-
-
Feed all three into a single block that goes to one “master” redstone torch inverter:
-
Place a block at the end of the combined line.
-
Put a redstone torch on the opposite side of that block.
-
This torch will power the door; when all three inputs are correct, your line turns ON and switches this torch OFF (unlocking).
-
A simple layout:
-
Each statue line: comparator → redstone dust chain (length tuned to pose) → block → side torch → dust to common line.
-
Common line → block → final redstone torch → dust to door.
Step 4 – Connect to the door
-
Place an iron door where you want the lock output.
-
Run redstone dust from the final torch’s block to the block under or beside the door so that:
-
Torch ON = door locked (no power to open circuit)
-
All statues correct → common line ON → final torch turns OFF → door circuit receives power and opens (or allows a button to finally work, depending on your design).
-
If you want it to open only after pressing a “confirm” button:
-
Run the “all correct” output into an AND gate with a button:
-
Both the code line and the button line must be powered to open the door.
-
Step 5 – Test and tune
-
Set all statues to the intended code poses; confirm the door opens.
-
Change any one statue to a wrong pose:
-
Its comparator output will now be too short or too long, so its torch will flip and break the “all correct” line.
-
The final torch turns back on and the door locks.
-
If a wrong pose still opens the door:
-
Add or remove dust on that statue’s line so only the exact pose reaches its target block.
Optional upgrades
-
Use more statues (4-6 digits) by repeating the same module pattern.
-
Hide the redstone behind walls and decorate the statues as a shrine or control panel.
-
Add lamps connected to each torch block to show which statues are correct or incorrect.