Prospectors in Roblox strike gold by chaining ore into rare loot-but only with the right recipes.
That’s where the crafting mechanic in Prospecting comes into the picture. You can improve your gear and give them a stat boost using rings, bracelets, and necklaces. Check out the list of Prospecting crafting recipes, including the materials required and prices.
List of Prospecting Crafting Recipes
This section provides a complete list of all prospecting crafting recipes available in Roblox. Each recipe shows the materials needed, crafting steps, and resulting items to help players create valuable tools, resources, and upgrades. Use this guide to plan your crafting progress, collect the right ingredients, and maximize your success in prospecting activities.
At the time of writing, there are 25 crafting recipes for rings, pendants, gloves, armbands, and more in Prospecting. Each provides you with a unique set of enhancements. While some boost the pan’s luck, others increase your strength while digging. Nonetheless, each equipment is ultimately in the game to help you dig rarer treasures and generate more money for you to upgrade your gear and progress faster. So, here are the crafting recipes for every equipment in Prospecting:
| Equipment | Materials Required | Stat | Price |
|---|---|---|---|
| Gold Ring | 5x Gold | Luck: 0.2 – 0.7 | $2,000 |
| Amethyst Pendant | 8x Platinum 2x Amethyst |
Luck: 0.5 – 2 Sell Boost: 0 – 15% |
$10,000 |
| Garden Glove | 5x Pyrite 1x Titanium 5x Gold |
Dig Strength: 0.2 – 1 Capacity: 0 – 5 |
$10,000 |
| Titanium Ring | 5x Titanium | Capacity: 1 – 13 | $20,000 |
| Smoke Ring | 4x Smoky Quartz | Modifier Boost: 5 – 15% | $20,000 |
| Pearl Necklace | 8x Pearl [ 0.1kg] | Luck: 1 – 4 Dig Strength: 0 – 4 |
$22,000 |
| Jade Armband | 4x Jade | Luck: 1 – 8 Capacity: 1- 10 |
$50,000 |
| Topaz Necklace | 3x Titanium 1x Topaz |
Luck: 1 – 5 Dig Strength: 0 – 4 Shake Strength: 0.2 – 1 |
$60,000 |
| Ruby Ring | 5x Platinum [ 0.25kg] 1x Ruby |
Luck: 1 – 3 Size Boost: 0 – 18% |
$45,000 |
| Lapis Armand | 2x Lapis Lazuli 4x Gold [ 0.5kg] |
Luck: 2 – 9 Dig Speed: 0 – 40% Shake Speed: 0 – 40% |
$111,000 |
| Speed Coil | 1x Meteoric Iron 3x Neodymium 5x Titanium |
Dig Speed: 0 – 70% Shake Speed: 0 – 70% |
$120,000 |
| Meteor Ring | 3x Meteoric Iron | Dig Strength: 0.5 – 3 Shake Strength: 0 – 1 |
$150,000 |
| Opal Amulet | 1x Opal 3x Jade [ 0.3kg] |
Luck: 2 – 13 Modifier Boost: 0 – 90% |
$400,000 |
| Moon Ring | 1x Moonstone [ 0.4kg] 1x Iridium [ 0.4kg] |
Luck: 1 – 7 Dig Speed: 10 – 40% Shake Speed: 10 – 40% |
$500,000 |
| Gravity Coil | 1x Aurorite 1x Moonstone 1x Osmium |
Capacity 10 – 140 | $1,000,000 |
| Heart of the Ocean | 10x Coral 5x Silver Clamshell 3x Golden Pearl |
Luck: 3 – 10 Shake Speed: 0 – 20% Sell Boost: 10 – 20% |
$1,000,000 |
| Guiding Light | 1x Catseye 2x Golden Pearl |
Luck: 5 – 20 Capacity: 10 – 40 Modifier Boost: 0 – 45% |
$1,500,000 |
| Lightkeeper’s Ring | 2x Opal 1x Lumium |
Dig Speed: 5 – 25% Sell Boost: 5 – 25% Modifier Boost: 5 – 25% |
$2,000,000 |
| Mass Accumulator | 1x Aurorite 1x Uranium 2x Osmium |
Capacity: 20 – 60 Size Boost: 10 – 80% |
$3,000,000 |
| Crown | 3x Ruby [ 0.25kg] 8x Gold [ 1kg] 2x Emerald [ 0.2kg] 1x Diamond 3x Sapphire [ 0.25kg] |
Luck: 5 – 30 Size Boost: 0 – 45% Sell Boost: 0 – 90% |
$5,000,000 |
| Royal Federation Crown | 3x Rose Gold [ 0.4kg] 5x Golden Pearl [ 0.2kg] 1x Pink Diamond |
Luck: 10 – 90 Size Boost: 0 – 90% Sell Boost: 0 – 180% |
$30,000,000 |
| Phoenix Heart | 3x Uranium 1x Inferlume 2x Starshine |
Luck: 100 – 300 Size Boost: -70 – -40% |
$40,000,000 |
| Celestial Rings | 1x Vortessence 8x Meteoric Iron [ 0.3kg] 5x Moonstone [ 0.3kg] 2x Catseye |
Luck: 5 – 30 Capacity: 50 – 250 Size Boost: 0 – 45% Modifier Boost: 20 – 140% |
$50,000,000 |
| Apocalypse Bringer | 4x Ashvein 10x Ruby 2x Palladium 1x Painite |
Dig Strength: 5 – 20 Luck: 10 – 40 Shake Strength: 2 – 6 Sell Boost: 20 – 60% |
$50,000,000 |
| Prismatic Star | 1x Diamond 1x Prismara 1x Pink Diamond 5x Borealite 1x Luminium 1x Starshine |
Luck: 5 – 20 Dig Strength: 2- 10 Capacity: 10 – 40 Dig Speed: 5 – 20% Shake Strength: 1 -3 Shake Speed: 5 – 20% Sell Boost: 10 – 20% Size Boost: 5 – 20% Modifier Boost: 5 – 20% |
$75,000,000 |
How Crafting Works in Prospecting
Crafting in Prospecting lets players combine raw ores and materials at workstations to produce tools, upgrades, and rare items. Select a recipe from the menu, ensure you have the required resources in your inventory, and confirm to begin the process. Each craft consumes materials instantly and yields the output based on the recipe’s yield rate, with higher-tier stations boosting success chances for complex items. Experiment with different combos to access advanced gear for deeper mining runs.
Before we jump into the steps of crafting equipments, let’s break down how the system works in Prospecting. Crafting is simple; you just need a few minerals and some in-game cash. But before using your rare materials, there are a few things you should keep in mind.
Using modified or heavier minerals increases your chances of crafting higher-quality gear. In short, better ingredients mean more stars, and more stars lead to better stats. The star-based rating is based on two things: the modifiers on raw minerals and their weight. The better minerals you put in, it improves the ‘quality‘ meter stars. Higher quality results in better possible stats.
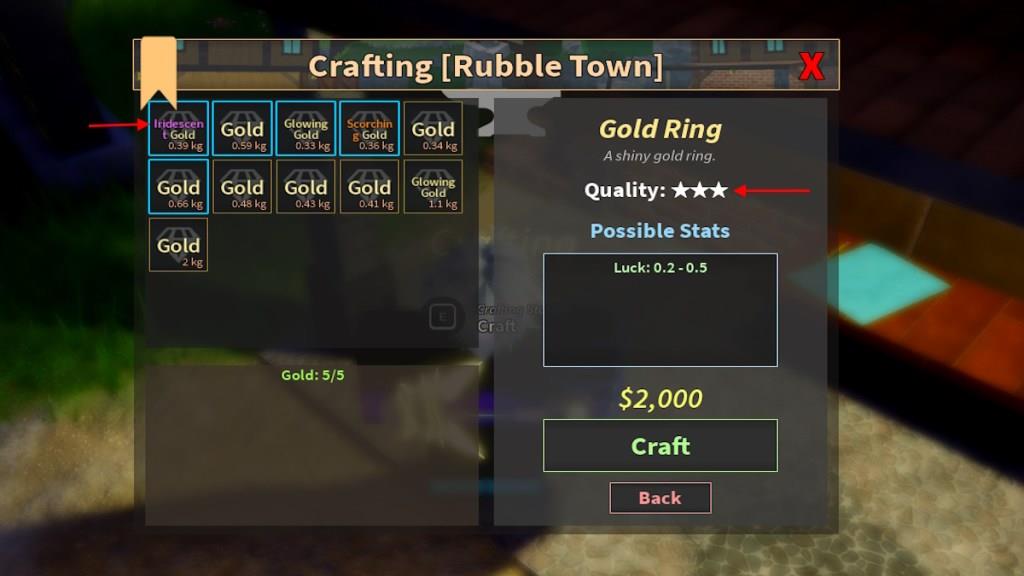
For example, if you are crafting a Gold Ring, make sure to use the heavier gold mineral from your inventory or modified minerals like Pure Gold or Scorching Gold. Remember, the better a modifier is, the higher the star rating you get for the crafted equipment. You can get modified minerals and heavier minerals by using better pans in Prospecting.
How to Craft Equipment in Prospecting
Crafting equipment in Prospecting involves combining specific materials gathered through mining, smelting, and refining. Each piece of gear requires a unique set of components, which can be found in ores, crystals, and other natural resources scattered across the map. Players use crafting stations to merge these materials according to the recipe, creating tools, weapons, or machinery that improve performance and resource collection. Upgrading crafted items often demands rare minerals, encouraging exploration and careful material management.
Now that you know the prices and minerals for each equipment, follow the steps below to craft them in Prospecting:
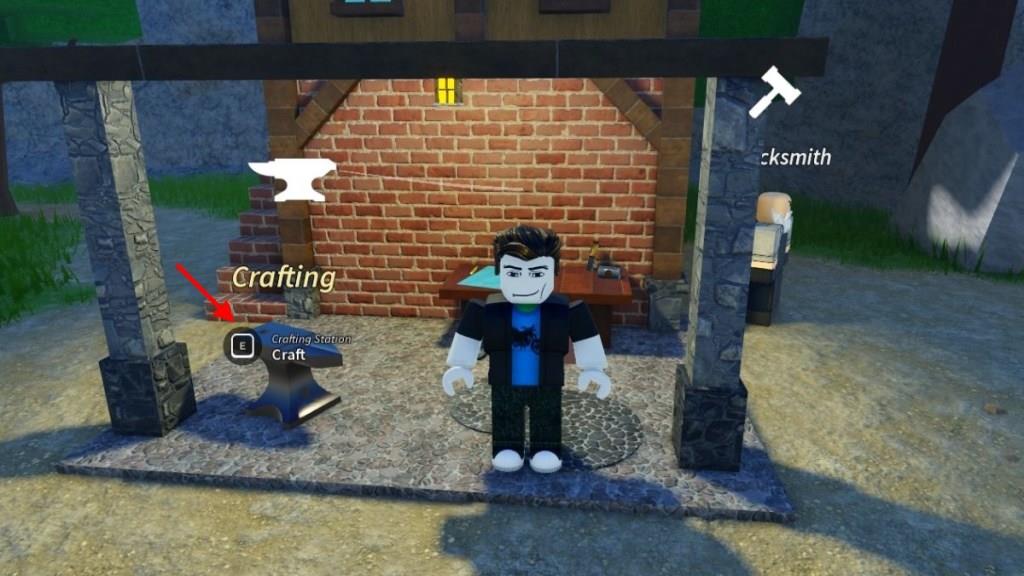
- Head over to the hut where the Blacksmith NPC is located in either Rubble Creek Sands or Rubble Creek Deposit islands.
- To the left of the Blacksmith, you will find a small iron anvil with the word ‘Crafting‘ on top.
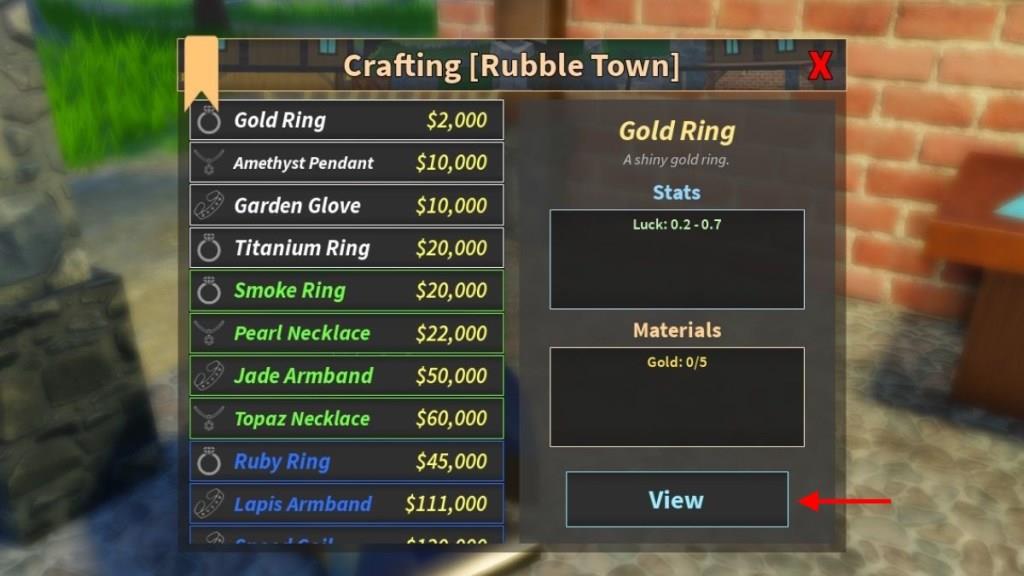
- Press the ‘E‘ key to interact with it, and the catalog with all the crafting recipes will open up.
- Select the recipe you wish to craft and then click the View button on the bottom right.
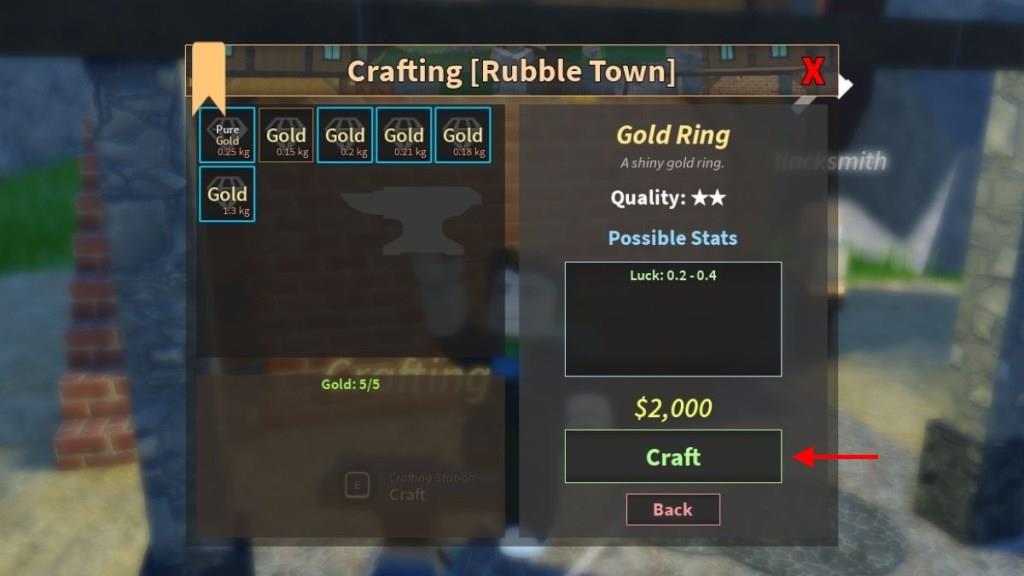
- Now select the minerals required on the left side, and click the Craft button on the bottom right.
- This will use up the minerals you selected and the required cash to craft the desired equipment.
Also Read: Roblox Prospecting Enchant Guide: All Enchants and How to Enchant Pans
How to Use Crafted Equipment in Prospecting
Crafted equipment boosts prospecting output in the game by processing ores faster and yielding higher-grade materials. Equip your character with items like the Reinforced Pickaxe or Ore Scanner from the crafting bench, then head to prospecting zones. Select the tool in your inventory, aim at ore nodes, and mine repeatedly to gather resources. Upgrade these tools using rare drops for better durability and speed during long sessions. Pair them with buffs from potions to maximize hauls from each run.
Now that you know how crafting and rerolling work, it’s time to learn how to use your crafted items. Prospecting has three equipment slots: neck, charm, and rings.
You can craft as many items as you like, but you can only equip one neck item and one arm item at a time. However, there are a total of eight ring slots.
Once you decide which equipment to use, select the Prospector Kit from the hotbar. Then, head to the Equipment tab and press the ‘Equip‘ button on the item you want to use. You can unequip an item anytime from the Equipped items section.
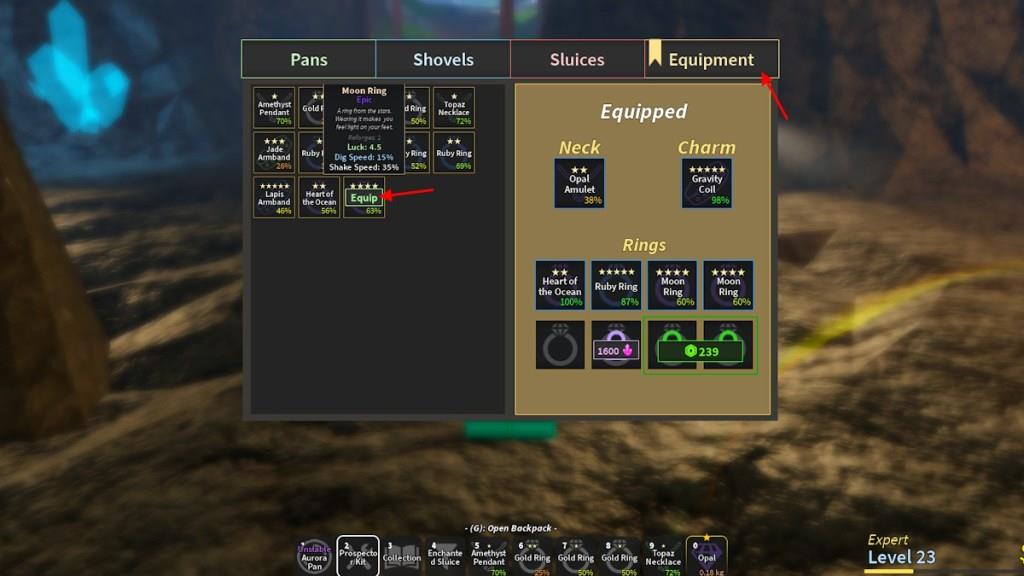
To equip more rings, you will need to unlock finger slots using Meteor shards. After six slots, you will need to pay 239 Robux to unlock the last two.
How to Reroll Equipment Stats in Prospecting
Rerolling equipment stats in Prospecting allows players to change the attributes of their crafted gear to get better performance or more desirable bonuses. To reroll, interact with the crafting station and select the item you want to modify. Spend the required resources, such as refined minerals or special tokens, to refresh the existing stats. The new results are random, so you might need several attempts to achieve the perfect combination. Keep track of your materials and plan rerolls carefully to avoid wasting rare resources.
Crafting doesn’t always guarantee the best stats on your equipment in Prospecting, even with the best raw minerals. If you’re not happy with the stats you get, you can reroll them by spending cash earned from playing or using Prospecting codes.
Keep in mind that the cost to reroll depends on the rarity of the equipment. Higher-tier gear will cost more to reforge. Moreover, the more times you reroll the same item, the more expensive it gets each time. That said, here’s how to reforge your equipment in Prospecting:
- Head over to the Blacksmith NPC beside the crafting station and press the ‘E‘ key to interact with him.
- Hold the equipment you want to reroll stats for and select the first dialogue saying, ‘Can you reforge this?‘
- Spend some cash on the basis of the rarity of the equipment to reroll the stats.
- Alternatively, you can use Robux purchased using real-world money to get the best stat for an item.
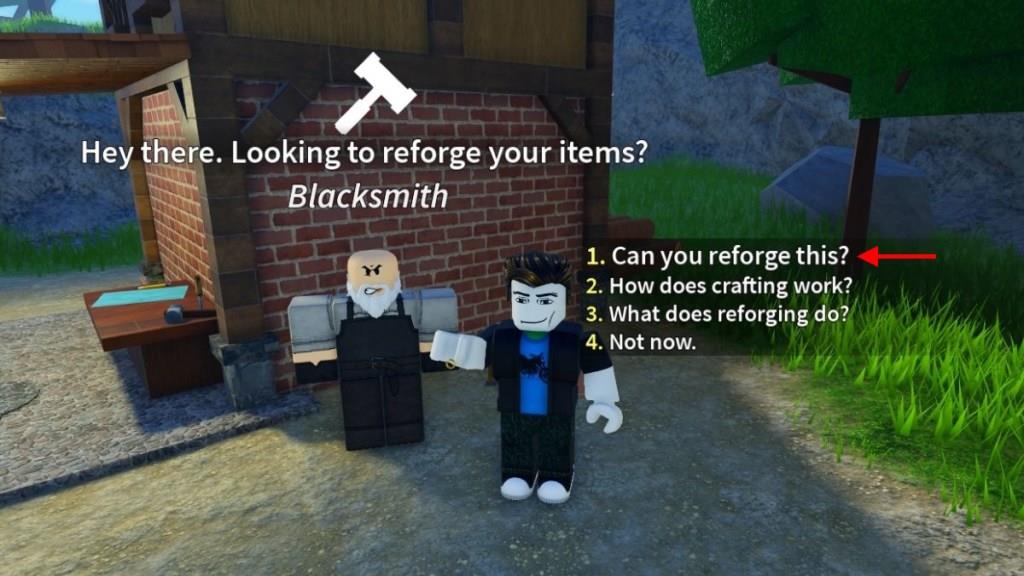
How to reforge items in Prospecting
Reforging in Roblox’s Prospecting lets players reroll stats on crafted equipment for better boosts like dig strength or luck. The process involves the Blacksmith NPC near the crafting anvil and scales in cost with each attempt.
Steps to Reforge
Approach the Blacksmith next to the anvil in spawn or Fortune River. Equip the item, select “Can you reforge this?” in dialogue, and pay the cash fee, which starts low but rises per reforge on the same item. Limit reforging to 5-star (or higher) gear, ideally no more than twice, as costs escalate quickly.
Costs and Tips
Reforge fees begin cheap (e.g., under 1 million for first tries) but climb to 6 million or more on repeats, resetting lower on 6-star items. Use Perfect Reforge Tokens from Traveling Merchants for ideal stat rolls without RNG risk-exchange them via the same dialogue for 2500 shards or Robux equivalents. Focus on high-quality bases for maximum value, as poor rolls waste currency.
Where is the Blacksmith located
In Roblox’s Prospecting, the Blacksmith is located right next to the crafting anvil in two main areas. Primary spots include the spawn area and Fortune River town, where the anvil and Blacksmith NPC stand side by side for easy access to reforging. This setup lets players craft gear first, then immediately talk to the Blacksmith for stat rerolls without extra travel.
