New to Roblox’s Dig? Learn how to boost your shovel stats, find rare treasures faster, and master digging strategies that help you climb the leaderboards in no time.
1. Learn Shovel Stats
Understanding shovel stats helps you choose the right tool for faster progress in Dig. Each shovel has unique attributes like power, speed, and capacity that determine how quickly you can gather resources and reach deeper layers. Compare stat differences before spending coins or upgrades to get the best value for your playstyle. A higher power stat means fewer hits to break blocks, while faster speed lets you collect more dirt in less time.
Before you grab your first shovel, it’s important to understand how Dig shovel stats work. During the tutorial, you will learn the digging minigame. The minigame is what you must play in order to progress further in the game.
Coming to the stats, each stat affects different parts of the Dig minigame. Here’s what each means and what it does:
- Strength lowers the left bar percentage, and stronger shovels dig quicker
- Control affects how big the bar is, making it easier to land successful digs
- Haste speeds up recovery after a failed attempt, letting you get back into action faster
- Endurance controls the heart progress bar at the bottom and determines how long you can keep digging
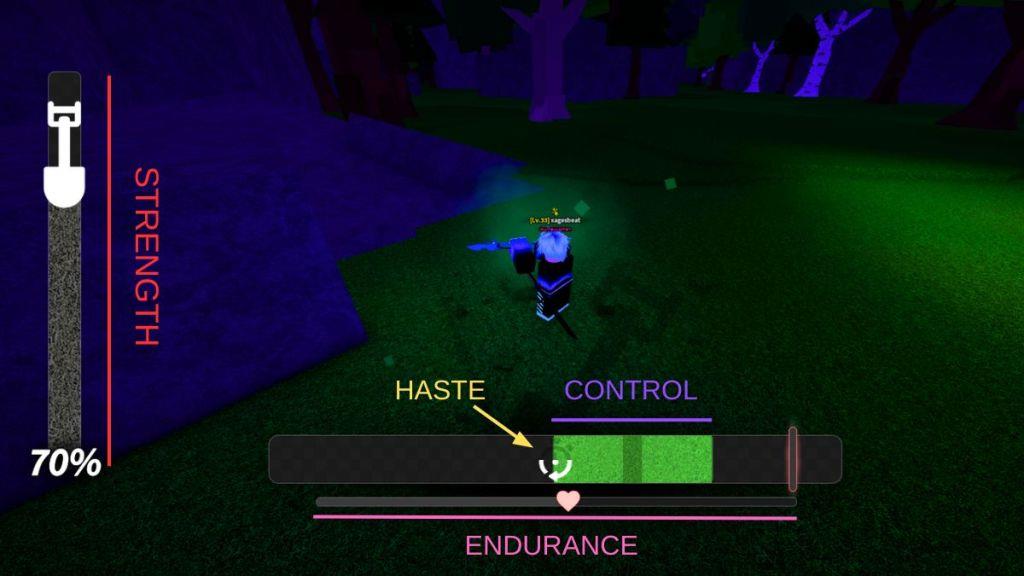
The Endurance stat doesn’t come from the shovel but is tied to charms and can be viewed in your profile. Remember, the more failed attempts you have, the faster the Rndurance drops during the digging minigame. When you know the mechanics and stats, our Dig shovel progression guide will help you pick the right one.
2. Find Ideal Digging Locations
Explore areas with loose soil, visible treasure marks, or clusters of tall grass, as these often hide valuable items. Check the edge of biomes, caves, and around structures where players usually miss buried rewards. Using a shovel with high range and speed stats helps cover more ground faster. Keep moving between dig spots to find fresh treasure locations before others do.
Now that you know how the minigame works, the next step is finding the best places to dig. The game might recommend buying a detector for $10,000, but honestly, it’s not worth it early on. We have a better strategy: follow OG testers or higher-level players and see where they’re digging. Most players in the Dig chat are pretty helpful, so don’t be shy to ask.
In the early game, Cinder Shores is the go-to spot for every player before getting the Ruby Shovel. If you’re ready for high-tier farming, I recommend heading to Mount Cinder.
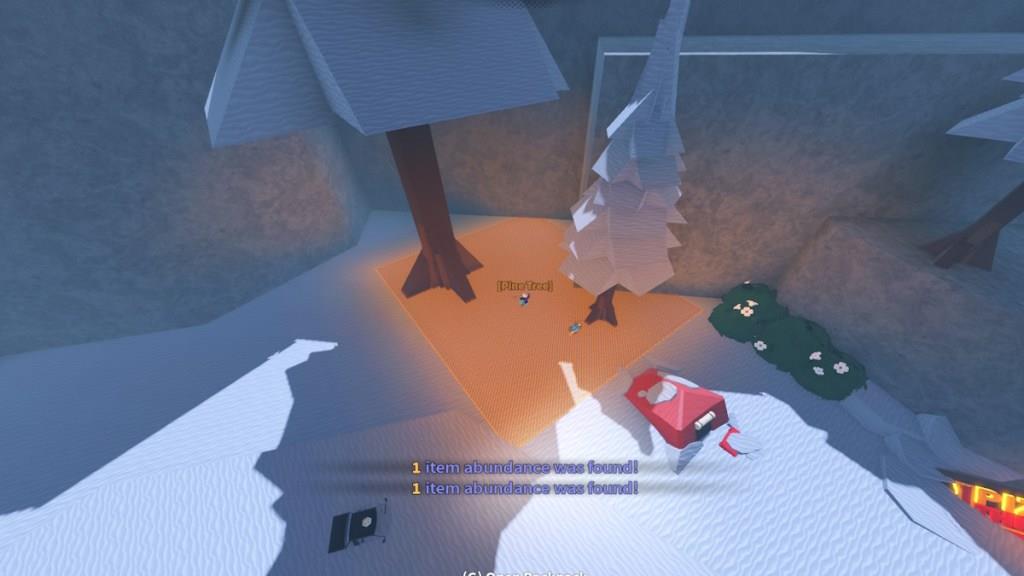
If you are skilled enough to dig legendary items with early-game shovels, try farming Pine Trees at coordinates: X= 3951, Y= 1124, -3214. Remember, digging in a bigger area of abundance gives you more space to dig while the holes are repairing.
Aside from high-abundance digging spots, there are also random, rare item spawns scattered across the map. As you explore the Dig map, keep an eye out for glowing beams coming from small holes in the ground. These mark special dig spots. If you dig there, you’ll get a guaranteed item matching the rarity shown by the color of the beam. For example, yellow is Legendary, red is Divine.
3. Start Quests Early On
Start quests as soon as you begin playing to gain quick experience, coins, and new tools. Quests often guide you toward areas with valuable treasures and higher-tier materials, helping you understand how different zones work. Completing them early also boosts your shovel stats faster, giving you a strong advantage in digging speed and soil depth. Keep an eye out for quest chains that reward rare items or upgrades-they can make your progress much smoother.
If you’re just starting and struggling with the digging minigame, we have a simple way out for you. Dig has other ways to help you make money and get items. There are a bunch of one-time quests that reward you with charms, buffs, or even shovels.
But if you want something to keep doing regularly, three recurring quests are great for farming cash and unlocking rare items like shovels, charms, totems, and buffs.
Start by heading to the northern area of Mount Cinder and look for the Pizza Penguin. He offers you pizza delivery quests that pay between $1,000 and $4,000 eash. If you complete 25 deliveries, you’ll unlock the Pizza Roller shovel, with free Arcane Totems every nine deliveries.

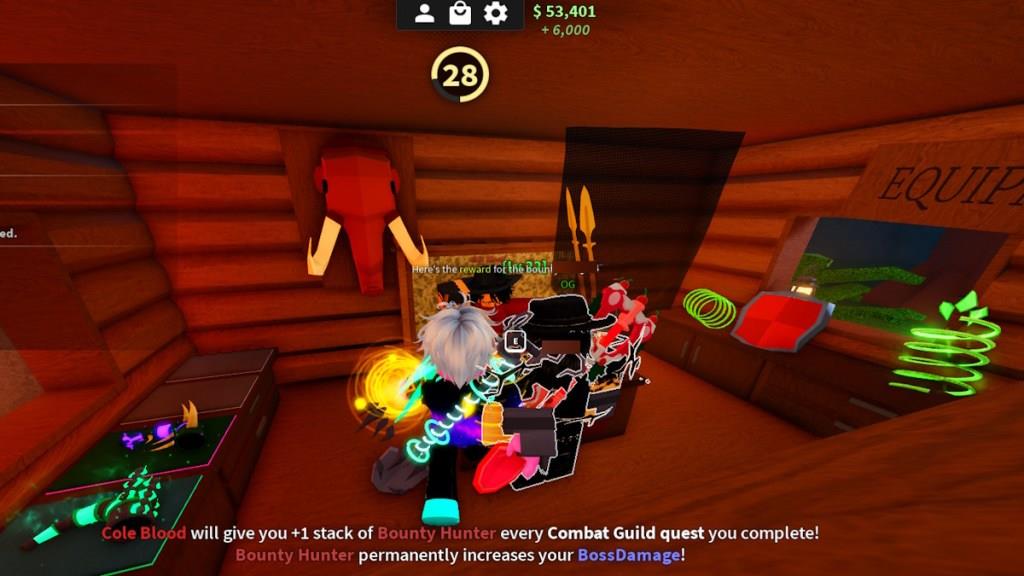
If you are into boss fights, go to the Combat Guild in Verdant Vale and talk to Cole Blood. He gives you combat tasks that reward you with huge money and a permanent boss damage buff. Keep at it, and you will also get Monarch Totems in Dig over time.
There is also Tom’s Bakery at the Cinder Approach. His quests give you muffins that give buffs, such as luck, strength, haste, control, and if you stick with him, you’ll unlock the Shortcake Shovel and earn Essence Totems while grabbing some sweets. The Tom’s Bakery questlines are perfect for growing stronger while stacking up solid rewards.

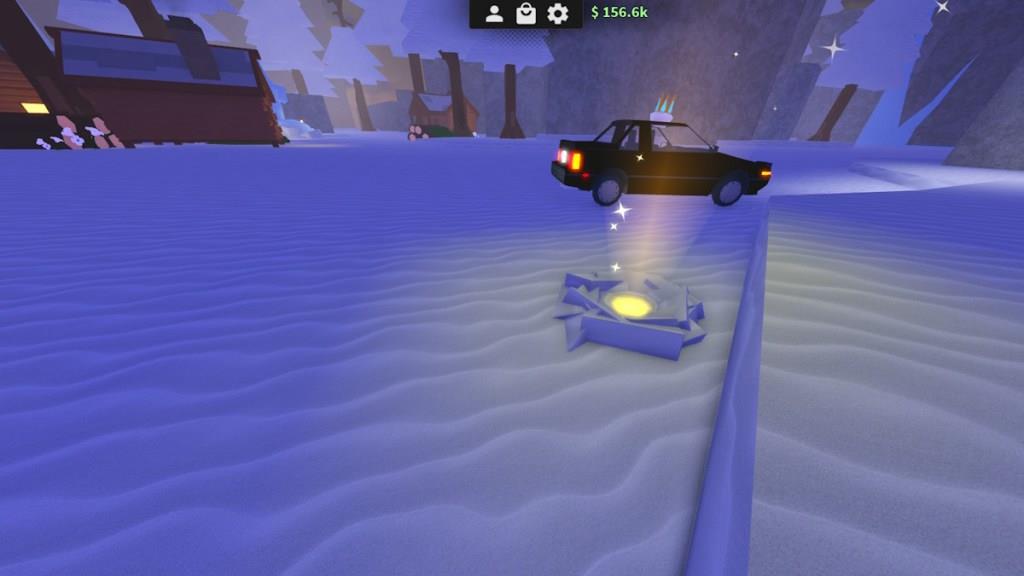
4. Don’t Buy Expensive Cars
New players often waste coins on flashy cars that promise speed but deliver little value. Stick to basic vehicles-they get you around the map fast enough without draining your budget. Save those funds for better shovels or upgrades that boost digging power and earnings. Expensive rides sit idle most of the time, offering no real edge in races or transport. Focus on tools that pay off with every swing.
Nope, this isn’t a life lesson, but in Dig, saving up for better shovels is way smarter than blowing cash on cars. The starter ATV you get in the tutorial is good enough for a long while. I learned this lesson the hard way by getting a $10,000 car before getting a Jam Shovel, which could’ve made me more money in less time. Only if the Dig tips and tricks for beginners existed for me to avoid such a newbie mistake.
Moving around might feel slow at first, but you can boost your walking speed using charms. So, whenever you spot a Traveling Merchant, check if they’re selling walk speed charms. Just equip them in a separate loadout for movement, and skip the expensive vehicles early on.

Once you’ve got the Gold Shovel and start making good money, go ahead and grab a Silver if you’re still itching for a ride.
5. Avoid Enchanting Low-level Shovel
Master the basics by choosing a shovel with balanced speed and durability, and avoid overfocusing on flashy stats. Prioritize steady digging, reliable tool health, and practical upgrades that keep you moving without frequent repairs or downtime.
If you’re coming from Fisch, you probably know how enchanting works. But if not, here’s a quick reminder: enchantments boost your shovel’s stats.
In Dig, enchantments give you percentage-based buffs to specific stats. That means if your shovel already has low stats, a 10% boost won’t make much of a difference.

Because of this, the game locks enchantment tome purchases until you reach level 30. Still, there’s a small chance to get an enchantment tome by digging. I recommend saving it and only using it once you have at least a Jam Shovel or a Spore Spade Shovel.
With the right enchantments, these tools can help you earn more money, gain XP faster, and even uncover rare items to complete your journals.
6. Participate in Boss Fights
Boss fights are a great way to earn rare rewards and test your digging skills. Each boss has unique attack patterns, so watch their moves carefully and time your dodges. Bring upgraded shovels and plenty of healing items to stay alive longer. Working with other players can help defeat tough opponents faster and share valuable loot. Winning these battles not only boosts your progress but also helps you gather materials needed for stronger gear.
Whether you have top-tier shovels or not, it’s always worth fighting the bosses in Dig. Bosses have a chance to drop rare items, including high-value loot, charms, and even shovels. As long as you’re dealing decent damage, you’ve got a shot at scoring something good.

These free rewards can boost your progress without spending extra cash. For example, getting the Abyssal Shovel or Candlelight Shovel early lets you skip past a bunch of early to mid-game shovel upgrades.
7. Use the Right Charms
Master a few reliable charms to maximize your shovel’s effectiveness: use a speed boost for quick digs, apply a durability charm to extend your tool’s life, and equip a luck charm to increase rare item drops. Rotate charms based on the terrain and the ore you expect to encounter, and always keep a spare set ready for uninterrupted mining sessions.
Once you have mastered the basics, here’s the ultimate tip to help you go pro in Dig: always keep multiple charm loadouts ready.
You only have one charm slot unlocked at the start, with the second slot unlocked at level 10. But after reaching level 25, you’d have unlocked three charm slots, and customizing them properly can reduce your need for high-level shovels.
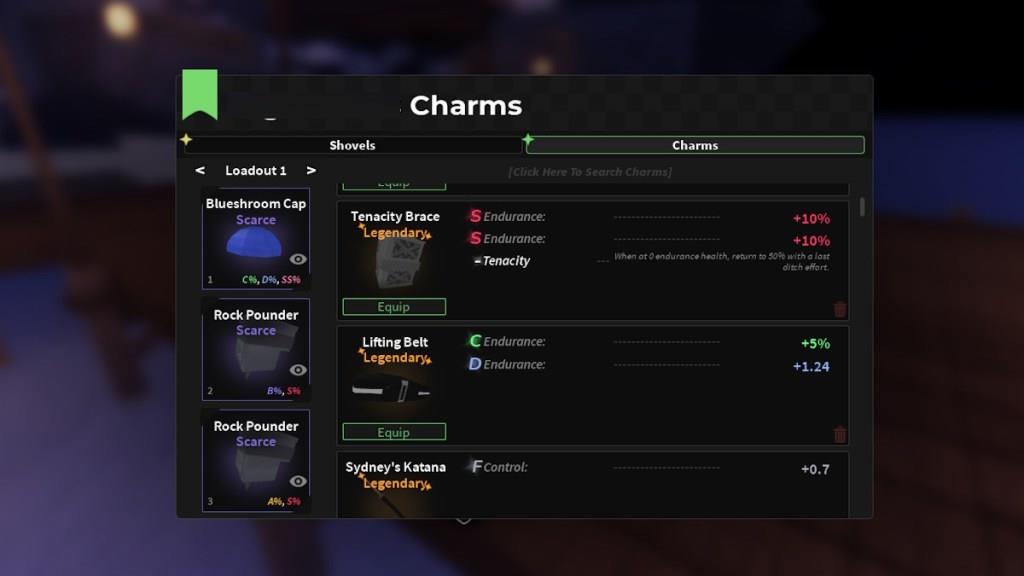
For example, pairing Blueshroom Cap with Rock Pounder gives a solid boss damage boost, while using Lifting Belt and Regen Coil boosts your endurance.
You can cycle between five different loadouts in Dig. In the end, your loadout determines how you approach boss fights, money farming, or even mountain climbing. If your charm stats are not perfect, you can tweak them anytime using a Charm Chisel.
Best early shovels to buy and why
Dig on Roblox offers a clear early shovel progression that prioritizes balanced stats like Control, Strength, and terrain match over flashy passives. Stick to these buys to maximize income without wasting cash on skips like the Iron or Jam Shovels.
Stage 1 Shovels (Fox Town, under 1,000)
Skip straight past the starter Wooden and Rusty Shovels-grab the Rock Shovel for 800.
-
High Control (6.5) and Strength (6.5) make minigames forgiving on Rock spots, where pros cluster early.
-
Rock preference speeds digs; avoid Copper unless you’re stuck on pure Dirt.
Stage 2 Shovels (Cinder Shores, 10k-14k)
Save for the Ruby Shovel (around 14k at Cindy’s)-ignore Bell unless you’re desperate.
-
Superior Strength and Control (better than Bell’s) carry you through money grinds to mid-game.
-
Handles both Dirt and early Rock well, boosting hit consistency over raw Haste.
Mid-Early Transition (Rooftop Woodlands, 30k)
Rush the Spore Spade (30k, big mushroom spot)-skip Jam entirely post-nerf.
-
Balanced stats (8/6/5) plus 10% Luck Totem spawns supercharge loot value on Rock/Dirt.
-
Long-term passive edges out pricier options, funding Gold Digger faster.
| Shovel | Cost | Key Stats | Why Buy | Preferred Ground |
|---|---|---|---|---|
| Rock | 6.5/6.5/1 | Easy first upgrade | Rock | |
| Ruby | ~14k | High Str/Control | Progression king | Dirt/Rock |
| Spore Spade | 30k | 8/6/5 + Totem | Loot multiplier | Rock |
Why this path? Each step doubles your dig speed and value-Rock for comfort, Ruby for power, Spore for scaling-hitting 100k+ hours faster than random buys. Match ground type always, and sell junk often to hit these milestones.
Which shovel offers the best speed versus strength tradeoff early game
Ruby Shovel stands out for the best early-game speed (Haste) versus strength tradeoff in Roblox’s Dig, balancing faster swings with solid progress per hit to outpace alternatives like Rock or Bell shovels.
Why Ruby Excels
Ruby Shovel (~14k at Cinder’s in Cinder Shores) delivers 7 Strength alongside 3.5 Haste, letting you complete digs in fewer, quicker swings without excessive misses.
This edges out Rock Shovel’s higher Strength/Control (6.5 each) but low 1 Haste, which drags on combos despite Rock preference.
Higher Haste reduces recovery time after weak hits, amplifying effective output on mixed Dirt/Rock terrain over pure power tools.
Key Tradeoff Comparison
| Shovel | Strength | Haste | Cost | Tradeoff Notes |
|---|---|---|---|---|
| Rock | 6.5 | High power, slow recovery | ||
| Ruby | 3.5 | ~14k | Optimal balance for speed+power | |
| Bell | ~6 | ~2 | ~10k | Weaker overall vs Ruby |
| Spore Spade | 30k | Later upgrade, haste-heavy |
Ruby’s combo of 13 Luck and particles adds minor value without sacrificing dig tempo, making it ideal until Spore Spade.
Prioritize it post-Rock for 2-3x faster farming sessions on early bosses or clusters.