Power shifts fast in Dead Rails, and April 2025 brings a shake-up that’s turning class rankings on their head. From unstoppable tanks to high-risk glass cannons, here’s how every class stacks up in Roblox’s chaotic shooter.
Thankfully for you, we have brought about a handy Dead Rails Class Tier list that will help you understand which class to pick and when. So with that, let’s begin.
Dead Rails Class Tier List: Overview
The Dead Rails Class Tier List ranks each class based on performance, utility, and popularity across game modes. It provides players with a clear view of which classes dominate current strategies and which ones need more skill or support to shine. This overview helps both new and experienced players choose classes that suit their playstyle and keep up with the latest balance updates in Roblox’s Dead Rails.
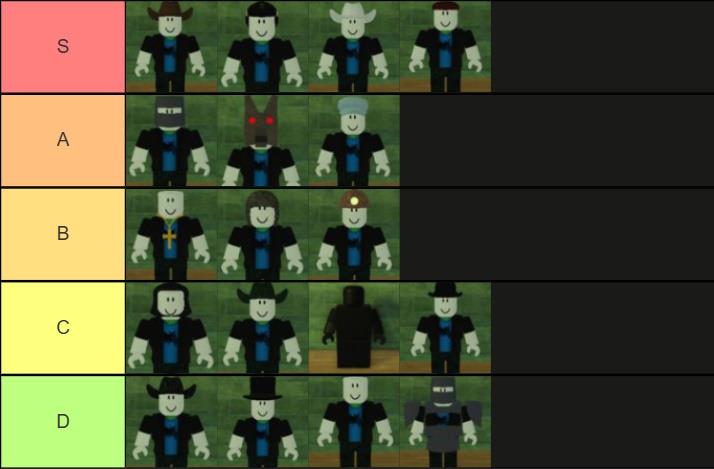
All of the 18 classes in Dead Rails spawn with a few items or have certain buffs or debuffs according to their character. Some of these are really useful while playing in teams or solo, and therefore lie at the very top of the list, the S-Tier. While others might be completely trash, and in my experience, these are not worth spending your hard-earned bonds.
The A-tier classes are good in their own ways, whereas the B-tier classes are really average, and their usability can vary depending on the player using them. Furthermore, the C and D-tier classes are some of the worst ones in the game. However, you may buy them in your beginner stages.
S-Tier
S-Tier classes dominate the current Dead Rails meta thanks to their outstanding versatility, high damage output, and strong survival tools. They excel in nearly every situation, allowing players to adapt smoothly to changing match conditions. These classes perform consistently well in both solo and team play, often defining the standard for balance across all other tiers. Players who master them can expect reliable results and a clear edge during competitive runs.
The S-Tier classes are the best ones available in Dead Rails, providing you with lots of materials and boosts as you start the run. However, they’ll cost you well, so make sure you have enough Treasury Bonds to begin with. Here are the best S-Tier classes in Dead Rails:
| Class Name | Starting Items | Passive Buffs/Debuffs | Cost |
|---|---|---|---|
| Cowboy | 2x Revolver Ammo 1x Saddle 1x Shovel 1x Revolver |
Nothing | 50 |
| Vampire | 1x Shovel 1x Vampire Knife |
Increased movement speed and melee damage. But damage from direct sunlight |
75 |
| High Roller | 1x Shovel | Sell Items at 1.5x Price 10x chances of getting struck by lightning |
50 |
| Survivalist | 1 Shovel 1 Tomahawk |
Lower your health, more damage you inflict | 75 |
Out of the Dead Rails classes above, we definitely reccomend getting the Cowboy as he comes armed with a stack of weapons to fight the undead.
A-Tier
This A-Tier tier list for Dead Rails Classes (April 2025) summarizes solid, reliable choices that balance build versatility, accessibility, and competitive viability, offering dependable options for players seeking steady performance without the extremes of higher tiers.
The classes in the A-Tier are also good and can provide you with great starting items and passives. However, compared to the S-Tier classes, they seemed to be lacking while surviving in the barren lands, and are not flexible enough to be used for solo runs. The Alamo is among the best in the A-Tier and can substantially support your team during the runs.
| Class Name | Starting Items | Passive Buffs/Debuffs | Cost |
|---|---|---|---|
| The Alamo | 1x Helmet 3x Metal Sheet 3x Barbed Wire 1x Shovel |
Nothing | 50 |
| Werewolf | 1x Shovel | 2x Movement Speed, Damage, and Health at Night. 0.9x stats during the Day. |
50 |
| Conductor | 2x Coal | Drives train at a faster speed | 50 |
Also Read: How to Get Unicorn in Dead Rails
B-Tier
B-Tier classes in Dead Rails hold their own with solid utility and decent damage output, making them reliable picks for most runs. They shine in specific scenarios like crowd control or quick clears but lack the raw power or versatility of higher tiers. Expect consistent performance without major weaknesses, though they demand precise play to maximize impact. Solid for beginners building skills or veterans filling team gaps.
Coming to the B-Tier, these classes are quite average in nature, with both pros that we can’t ignore and cons that are big enough not to include them in higher tiers. The most prominent class in this tier is the Miner. With so little cost, you get some efficient passives that can help in both solo and team runs. With that said, here are the rest of the classes.
| Class Name | Starting Items | Passive Buffs/Debuffs | Cost |
|---|---|---|---|
| Priest | 2x Crucifix 2x Holy Water 1x Shovel |
Immunity from Lightning Strikes | 75 |
| Packmaster | 1x Shovel | Spawns 3 Wolves at starting. Can tame any Wolf that bites you. |
35 |
| Miner | 1x Mining Helmet 2x Coal 1x Pickaxe |
Mines Ores with 2 hits. | 15 |
C-Tier
Dead Rails Classes in the C-Tier showcase a mix of reliable mechanics and occasional inconsistencies, offering solid utility without the flash of higher tiers.
In the C-Tier, we have a few beginner-friendly classes like Doctor and the Horse that might be of some help at the early stages of the game. However, as you progress, far better classes are available. So, it will be wise to save the bonds now, team up with trustworthy people, and farm the Treasury Bonds.
| Class Name | Starting Items | Passive Buffs/Debuffs | Cost |
|---|---|---|---|
| Necromancer | 1x Shovel | 25% to reanimate enemies when killed with Melee weapon. Costs 10 HP for each reincarnation. |
35 |
| Arsonist | 1x Shovel 4x Molotov |
Deals 2x Fire Damage | 20 |
| Horse | 1x Shovel | Faster Movement Speed. No Health Regeneration |
Free. Can be obtained by completing Horsing Around Quest. (currently unobtainable) |
| Doctor | 1x Shovel 2x Bandage 2x Snake Oil |
Can Revive Teammates at the cost of half of your health | 15 |
D-Tier
Classes placed in D-Tier struggle to keep up with the pace of battle and often lack reliable abilities to contribute meaningfully in most encounters. Their damage output, survivability, or utility lags behind higher-ranked options, making them poor choices for both new and experienced players. These classes can still be used for fun or experimentation but are generally considered underpowered in the current meta.
Finally, the D-Tier consists of some of the worst classes in the game, including Zombie and Ironclad. A couple of them are expensive and don’t provide any great passives. While others are not worth spending your bonds at all.
| Class Name | Starting Items | Passive Buffs/Debuffs | Cost |
|---|---|---|---|
| Zombie | 1x Shovel | Can regenerate health by eating dead bodies. Less detected by enemies. Cannot use bandages or Snake Oil |
75 |
| Musician | 1x Banjo | Can slowly heal your teammates by playing the Banjo | 15 |
| None | 1x Shovel | Nothing | Free. Starter Class |
| Ironclad | 1x Helmet 1x Chestplate 1x Left Shoulder Armor 1x Right Shoulder Armor 1x Shovel |
10% Reduced Movement Speed | 75 |
Best classes for solo versus squad play in Dead Rails
Vampire and Survivalist stand out as top solo classes in Dead Rails for their self-sustain and damage output, while Cowboy and Conductor shine in squad play through mobility and team utility. Player discussions and tier lists emphasize solo picks for independence against zombies and bosses, contrasting with squad options that boost group speed or defenses.
Solo Play Recommendations
Solo runs demand classes with starting weapons, health regen, or buffs to handle threats alone without relying on teammates.
-
Vampire: Tops most lists with speed, vampire knife for lifesteal, and quick health recovery-even sunlight debuff is manageable solo.
-
Survivalist: Damage ramps up at low health, pairs with shovel and tomahawk for aggressive clears.
-
Cowboy: Revolver, ammo, and horse enable fast scouting and early fights, great for beginners.
Avoid Conductor or Alamo solo, as they lack melee and suit team protection.
Squad Play Recommendations
Squads benefit from utility classes that speed progress or fortify the train.
| Class | Squad Strength | Cost (Bonds) |
|---|---|---|
| Conductor | Faster train speed, extra coal | Varies |
| Cowboy | Horse for shared travel, revolver support | |
| Doctor | Bandages for healing allies | Varies |
| Alamo | Metal sheets/barbwire for group defenses | Varies |
High Roller aids economy for team buys but risks lightning solo. Pick based on role-drivers take Conductor, fighters grab Vampire.
Which classes excel at speedrunning solo play
Cowboy and Vampire excel at speedrunning solo play in Dead Rails due to their mobility, starting weapons, and self-sustain for quick clears. Survivalist follows closely with damage scaling that speeds up boss fights at low health. These picks prioritize fast scouting, zombie hordes, and train progression without team reliance.
Top Speedrun Classes
Speedrunners favor classes with speed boosts or ranged options to minimize downtime.
-
Cowboy: Horse mount for rapid travel, revolver for early ranged kills-ideal for outpost rushes and solo PB records.
-
Vampire: Knife lifesteal sustains aggressive pushes; speed and regen cut run times despite sunlight risks.
-
Survivalist: Tomahawk/shovel combo clears packs fast; low-health buff shines in optimized no-death runs.
Comparison Table
| Class | Speedrun Strength | Weakness vs Squads |
|---|---|---|
| Cowboy | Mobility + ammo economy | Less sustain solo |
| Vampire | Sustain + melee burst | Sunlight debuff |
| Survivalist | Scaling DPS peaks late-run | Fragile early-game |
Avoid Doctor or Conductor for solos-they lag without allies to leverage heals or train buffs. Practice routes on maps like Kansas for sub-20 minute completions.
