Fortnite might not run natively on macOS anymore, but that doesn’t mean Mac players are out of options. With Xbox Cloud Gaming and a few smart workarounds, you can jump into the battle royale without switching devices or installing Windows.
So keep on reading and get back into the action as we teach you how to play Fortnite on Mac here.
How to Play Fortnite on Mac
Fortnite on Mac can be played using multiple methods, including the official Mac client if available, cloud gaming options like Xbox Cloud Gaming through a browser, or streaming from a compatible PC. Each approach has its own setup steps and performance considerations, so choose the one that best fits your hardware and connection.
1. Xbox Cloud Gaming (Free)
Xbox Cloud Gaming is probably the easiest way to start with Fortnite on your Mac. Despite the fact that this cloud service is a paid one, running titles like Fortnite is completely free. All you need to do is link your Epic Games account to Xbox Cloud and follow the steps below:
- In your web browser, visit the official Xbox Cloud Gaming website
- Sign in with your Microsoft account or create one if needed
- Link your Epic Games account to save your progress
- Find Fortnite in the game library and click “Play”
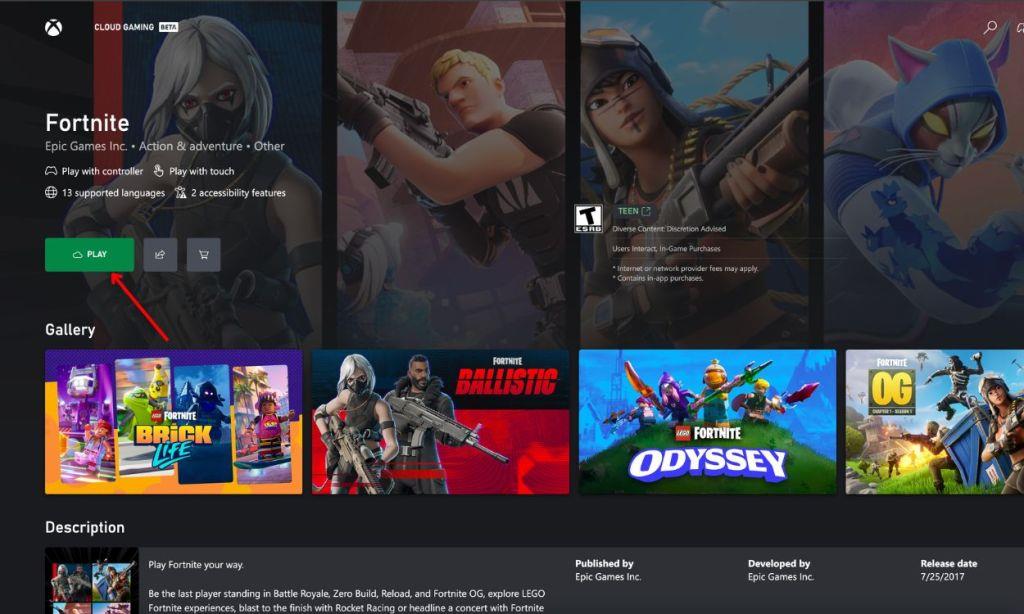
One thing to note is that Xbox Cloud Gaming currently only supports controllers, not keyboard and mouse. Furthermore, you’ll need a decent internet connection for smooth gameplay. Thankfully, you don’t have to install anything and can simply play it from the browser. Also Read: How to Get Free Fortnite Skins (January 2025)
2. Amazon Luna
If you already have an Amazon Prime subscription, then Luna is an excellent choice since it’s included at no extra cost. Luna supports both controller and keyboard/mouse controls, giving you more flexibility in how you play. Follow the steps below to play Fortnite on Mac using Amazon Luna:
- Visit the official Amazon Luna website and log in with your Amazon account
- Find Fortnite in the Free to Play section
- Click “Play Now with Prime”
- Finally, link your Epic Games account when prompted
If you don’t have Prime, you can sign up for Luna separately for $9.99 monthly, with a 7-day free trial available for new users.
3. NVIDIA GeForce Now
GeForce Now offers both free and paid tiers, making it a flexible option for different budgets. The free tier lets you play Fortnite without spending anything. Follow the steps below to do so:
- Start by visiting the official Nvidia GeForce Now website and login with your account
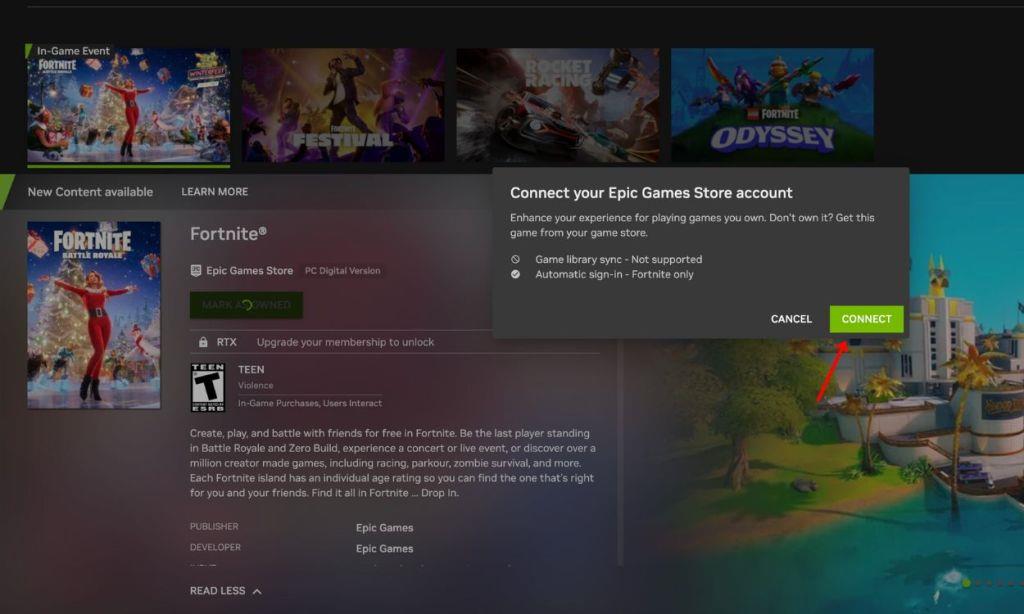
- Click the “Connect Your Store Accounts” option on the left side of the page and then choose Epic Games
- Follow the prompts to connect your Nvidia and Epic accounts
- Finally, launch Fortnite from the game library
Why Can’t You Play Fortnite on Mac?
Fortnite isn’t officially supported on macOS with the standard installer, and Apple’s recent security and app-signing changes, plus Epic Games’ cross-platform strategy, mean Mac users often face compatibility hurdles, frequent workarounds, and the risk of instability when attempting to play.
The short version is that Apple terminated Epic Games’ ability to develop Fortnite for Mac in 2020 during their legal dispute. While Fortnite has recently returned to iOS devices in the European Union, Mac users worldwide still can’t download and play the game directly through the Epic Games Store like before.
Xbox Cloud Gaming Fortnite latency on Mac
Xbox Cloud Gaming on Mac always has some added latency compared to playing Fortnite locally, but with a good setup it can feel very playable for casual and even mid-level competitive matches.
What Latency To Expect
-
Cloud gaming typically adds at least ~50-100 ms of total input delay versus a local console or PC, even on a solid connection.
-
Many players describe Fortnite over Xbox Cloud Gaming as having a “small amount of input lag” that is noticeable in shooters but still manageable if your internet is strong and you are near a data center.
-
For a decent experience, aim for a loaded latency (ping while something is downloading/streaming) under about 50 ms; above that, aiming and building will start to feel sluggish.
Main Causes of Lag on Mac
-
Web-based streaming: On Mac you run Xbox Cloud Gaming in a browser (Safari/Chrome/Edge), which adds overhead vs a native app.
-
Wi-Fi quality: Cloud gaming over Wi-Fi is “hit or miss”; interference and distance from the router can spike latency and cause stutters.
-
Distance to Microsoft’s servers: If the nearest Xbox cloud region is far, round-trip time increases, which you feel as input lag.
-
Bluetooth controllers: Bluetooth can add a few extra milliseconds of delay on top of the network latency.
How To Reduce Fortnite Latency on Mac
-
Use wired Ethernet if possible; many Mac gamers report dramatically better cloud-gaming responsiveness with Ethernet vs Wi-Fi.
-
If you must use Wi-Fi, use a 5 GHz network, stay close to the router, and limit other devices streaming or downloading.
-
Try different browsers (Safari, Edge, Chrome) and use any “optimize for media/streaming” or low-latency flags you can enable.
-
Close background apps and browser tabs so your Mac’s CPU and bandwidth are focused on the stream.
-
Play at off-peak times when your ISP and the Xbox servers are under less load, which can reduce spikes and stutter.
When Cloud Fortnite Feels “Too Laggy”
-
Very competitive zero-build/build modes, fast editing, and flick aiming are where cloud latency hurts most; some players find it unacceptable for high-rank lobbies.
-
If you consistently see high latency alerts or rubber-banding even after optimizing your network, your only real fixes are a better ISP, closer server region, or switching to a local PC/console for Fortnite.
If you share your connection type (Wi-Fi vs Ethernet), typical ping, and Mac model, more concrete expectations and tweaks can be suggested for your setup.
How to check Xbox Cloud latency with azurespeed
You can use AzureSpeed to estimate your Xbox Cloud Gaming latency by testing ping to Azure regions, then comparing results to where Xbox cloud servers likely run.
Step-by-step with AzureSpeed
-
Open the Azure latency page
-
Go to the Azure Latency Test site (AzureSpeed latency page) in your Mac browser.
-
-
Select Azure regions to test
-
On the page, you will see a list or map of Azure regions (for example, West Europe, North Europe, East US, West US, etc.).
-
Tick the regions that are geographically closest to you and also common xCloud locations (for many users, this is a nearby Azure “East/West/North/South” region in their continent).
-
-
Run the latency test
-
Click to start the latency test; the site sends HTTPS requests from your browser to storage endpoints in those Azure regions and measures round-trip time.
-
Wait a few seconds; the results table will show median latency for each selected region in milliseconds.
-
-
Interpret the numbers for Xbox Cloud
-
These values are not exact Xbox Cloud Gaming ping, but they are a decent indicator of how far you are (network-wise) from Microsoft data centers that might host Xbox cloud blades.
-
For fast shooters like Fortnite:
-
Under ~30 ms to the best region is generally considered very good.
-
30-60 ms is usually playable but you will feel some input delay.
-
Above 60-70 ms often starts to feel laggy, especially for competi
-
-
