A new wave of powerful foes rises in the Luna IV update, each with unique attack patterns, hidden weaknesses, and rewards worth the risk. From mechanical titans to spectral guardians, here’s what you’ll face-and the best strategies to bring them down.
All New Genshin Bosses in Luna IV Update
The Luna IV update introduces several new bosses that challenge players with fresh mechanics and elemental abilities. Each enemy requires a unique strategy and team composition, rewarding those who study their attack patterns and weaknesses. From massive mechanical constructs to ethereal elemental creatures, these foes push players to adapt their tactics and refine combat timing. The update also brings exclusive materials from these bosses, needed for character ascension and new weapon crafting.
Genshin Impact Luna IV added five new bosses – two elite and three Nod-Krai local legends. Here is a full list of all the new Genshin bosses in the Luna IV update.
| Name | Location |
|---|---|
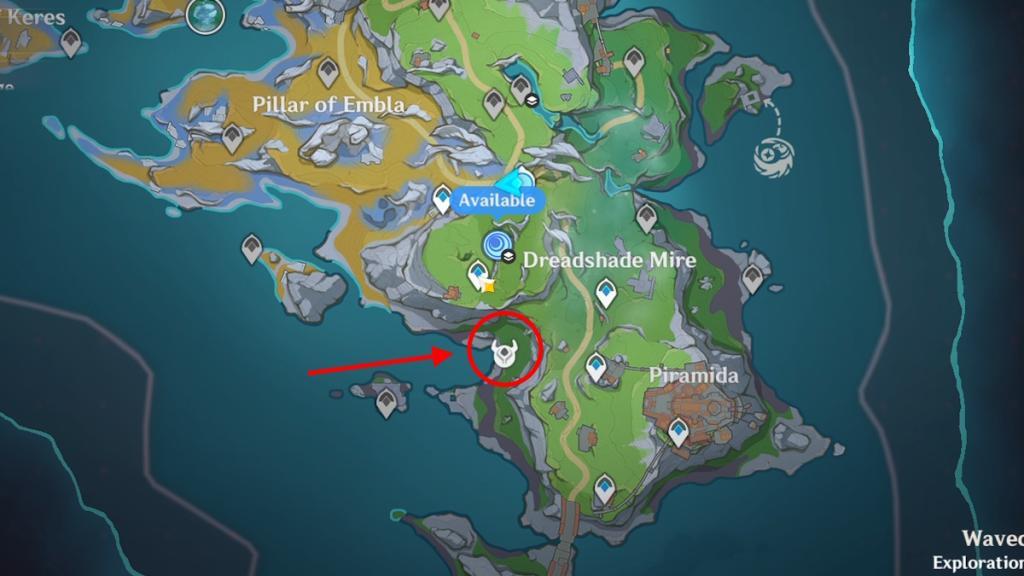
| Hexadecatonic Mandragora | South West of Dreadshade Mire |
| Hiljetta | North east of Dreadshade Mire |
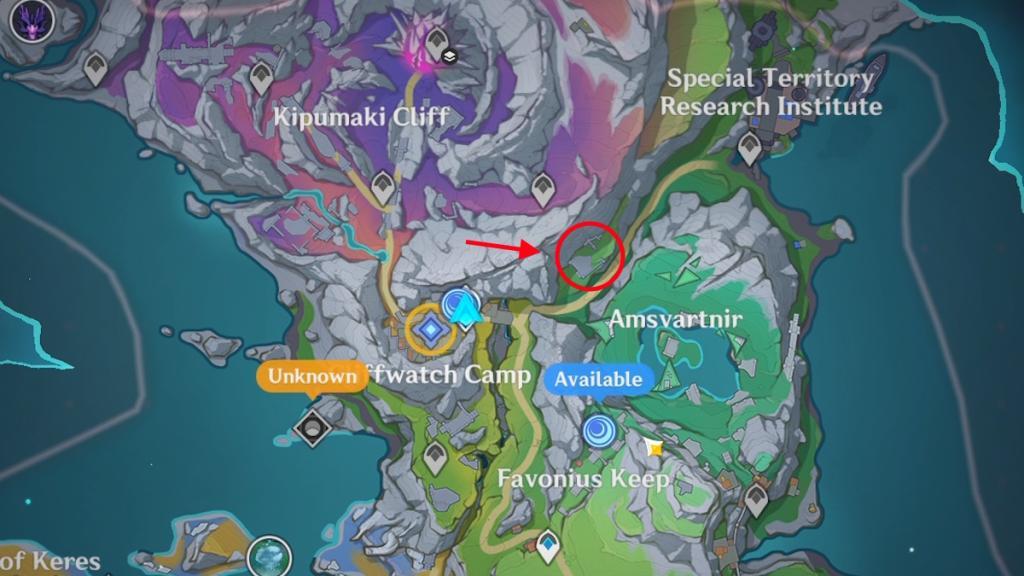
| The Homesick Lone Wolf | South of Kipumaki Cliff |
| Heretic of the False Moon ‘Il Dottore’ | False Moon Institute Domain |
| Lord of the Hidden Depths: Whisperer of Nightmares | Ashveil Peak |
How to Defeat Hexadecatonic Mandragora in Genshin Impact
Found west of Piramida in Nod-Krai, the Hexadecatonic Mandragora shifts between a large mushroom form with jumping Dendro attacks and smaller split forms that hurl Dendro cores. Use Pyro characters to burn its Dendro gauge rapidly and force phase transitions while avoiding its strikes. For achievements, destroy all spores from the initial Sporebloom before they merge using AoE DPS or Anemo grouping, then land the final hit on its grounded smaller forms after they recombine.
Hexadecatonic Mandragora is one of the new local legends of Nod-Krai added in the Genshin Impact Luna IV update. You can find it southwest of Dreadshade Mire, and it is not tied to any missions. Simply head to the marked location below, and you will be able to find it.
The Hexadecatonic Mandragora boss uses dendro attacks and hits pretty hard. It has two phases that it shifts between. You can use Pyro characters to quickly make it transition through the phases to make it skip big attacks.
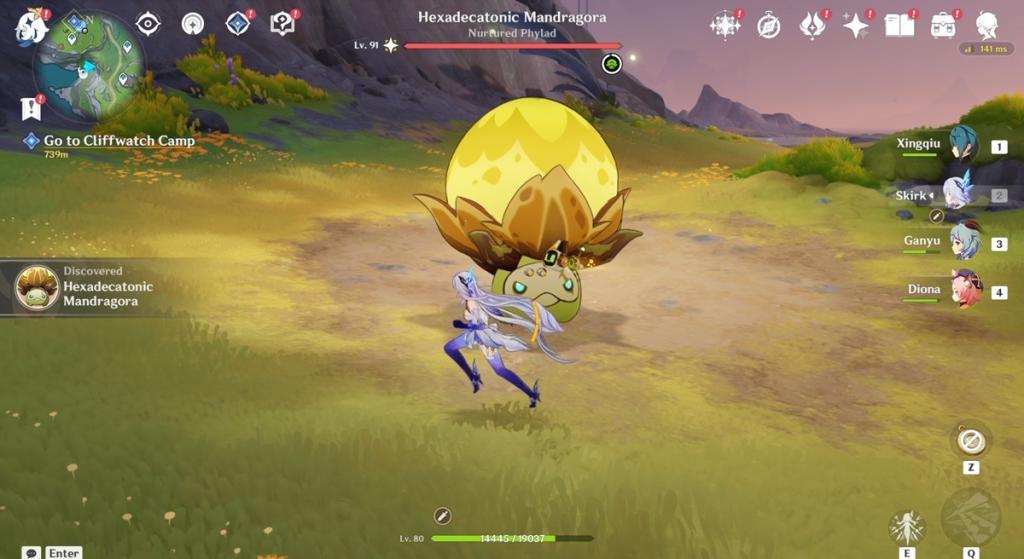
The first phase is how you will find it on the map. It appears as a big mushroom and deals pretty strong and fast jumping attacks. The second phase splits it into multiple short mushrooms. The smaller mushrooms throw dendro cores at you, which deal damage.
To complete the Valinat Chronicle challenge, you will need to quickly defeat all the small mushrooms in its second phase before it transitions. Hexadecatonic Mandragora is weak to Pyro, so use Pyro-related reactions to defeat it quickly.
How to Defeat Hiljetta in Genshin Impact
Hiljetta lurks in Wavechaser Plain northeast of Dreadshade Mire in Nod-Krai. Dodge her slow-charging melee punches and dashes that hit hard without armor. Apply Freeze three times to block her battle armor summons, or use Overload to destroy incoming pieces; defeat her before the third attempt lowers risk from one-shot attacks.
Hiljetta is also one of the new local legends of Nod-Krai, and she appears in the Wavechaser Plain. This boss appears to be very slow, but each of her attacks can almost one-shot you. So, focus on avoiding her attacks. Her attacks are easy to avoid as she takes quite a long time to charge them.


Next, Hiljetta is weak to the Freeze reaction. Freezing her prevents her from attaching her battle armor, which makes the fight much easier. You will need to do this three times during the fight to complete her Valiant Chronicle. If she gets her armor, her attacks will one-shot you. If you don’t have a freeze team, you can still use the power of Kuuvahki to disrupt it.
How to Defeat The Homesick Lone Wolf in Genshin Impact
The Homesick Lone Wolf relies on swift strikes and frost-based attacks that punish players who stay too close for too long. Keep moving to avoid its biting lunges and time your dodges right before it howls to release a freezing shockwave. Pyro damage works best against its Cryo armor, quickly breaking its defenses and exposing its weak core. When the Wolf begins summoning icy copies, focus on destroying them fast to prevent a flurry of powerful combo attacks.
The Homesick Lone Wolf is the third new local legend added in Genshin Impact Luna IV. This Genshin boss is one of the favorites, and day 1 players would be able to appreciate it a bit more. Fighting this boss is also quite challenging, as it summons its ancestors during the fight. The ancestor appears with a full shield, making it extremely hard to defeat it unless you know what to do.
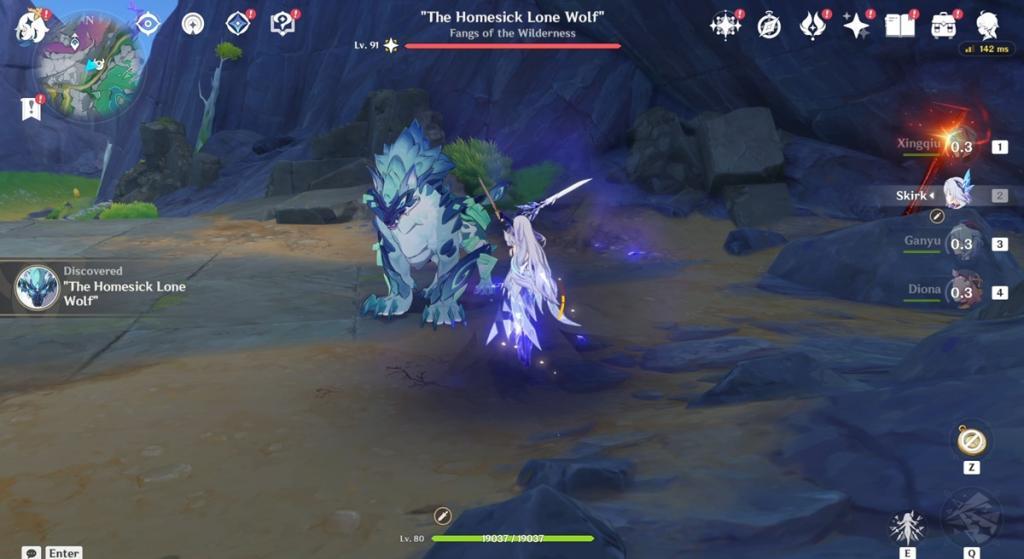
You will need to use Electro or Pyro Swirl reactions to break this armor and make it vulnerable. Once you break the shield, the wolf will be incapacitated. Capitalize on dealing damage during this brief period to quickly defeat this boss.
How to Defeat Heretic of the False Moon Il Dottore in Genshin Impact
Il Dottore, the Heretic of the False Moon, unleashes cryo and electro attacks in multiple phases during the Luna IV update. Target his cryo shield with pyro characters like Bennett or Xiangling to break it quickly, then switch to hydro or dendro for electro application on his exposed core. Dodge his lunar beam sweeps and segment slams by sprinting sideways, while using shields from Zhongli or Layla to block unavoidable bursts. Pyro resonance boosts melt damage on cryo phases, and electro-charged reactions disrupt his summons. Keep healers on rotation to counter his healing pulses between phases.
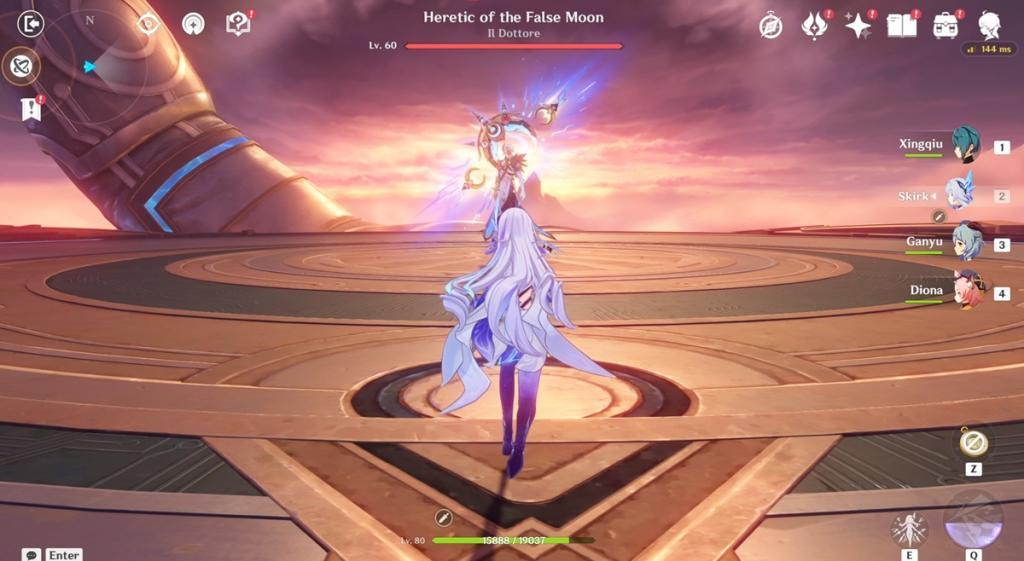
Heretic of the False Moon Il Dottore is the final villain of Genshin Impact Luna IV. After fighting him in the Archon quest, he also becomes available as a weekly boss in the Trounce Domain False Moon Institute. This boss has multiple movesets that are very unique. Here is a quick overview of all its movesets:
- Rules: Il Dottore will impose three rules from time to time. Failing to follow these rules will remove the energy from all characters in the party. However, if you follow them correctly, the energy for all characters will be completely recharged instantly. Here are the three rules.
- Do not face the Doctor: When this rule is applied, do not face your character’s camera towards The Doctor. As attacking most characters requires doing that, you can simply look elsewhere and stay still.
- Stay: During this rule, moving is punished. You can either stay still or attack the boss with melee at very close range.
- Reverse: This rule simply alters the direction of movement of the player. So, right becomes left and vice versa. This rule cannot fail.
- Moonfall: Il Dottore drops three big pillars that deal damage if they fall on you. These pillars act as a barrier for his next attack, so take cover behind them to be safe from his attacks. Doing this will also regenerate energy for all characters in your party. Make sure to stay behind the pillar until Il Dottore completes his attack, or else it will deal massive damage.
- Rifts: Il Dottore will create three rifts in an area. Standing in the rift will constantly give Cryo damage to the character. You can enter the rift and defeat the shade behind it to stop the area of effect. Generally, you will need to avoid standing in that area. The only time you should defeat the wraith is when Il Dottore is also standing on the rift.
- Rainfall: The boss will make massive raindrops fall from the sky that will deal damage. At the very end, a big area of effect around Il Dottore will get one final rainstorm, which would deal massive damage. To avoid this attack, simply run around and exit the final raindrops’ radius. You will know when the final attack happens as the rain will start to go upwards right before it.
- Ice Pillars: For this attack, Il Dottore summons massive Ice Pillars and throws them at the Traveler. In total, he will throw five such pillars, so make sure to avoid them. You can do so by staying near the middle or entering one of the rifts.
Overall, Il Dottore is fairly easy to defeat and can be defeated on any team. All you have to do is follow the mechanics above, and you are good to go.
How to Defeat Lord of the Hidden Depths Whisperer of Nightmares in Genshin Impact
The Lord of the Hidden Depths, Whisperer of Nightmares, is a Hydro-Anemo hybrid boss that shifts between summoning dark currents and illusions to disorient players. During its Hydro phase, focus on bringing Electro or Cryo characters to break its shield quickly, while the Anemo phase is vulnerable to Geo and strong physical damage. Keep moving to avoid its sweeping wave attack and use ranged characters to hit weak points exposed after it conjures nightmare echoes. Timing bursts after each illusion dissipates greatly increases damage potential before it regenerates defenses.
The Lord of the Hidden Depths Whisperer of Nightmares boss is one of the new overworld bosses added in Genshin Impact Luna IV. This boss is very strong, but it doesn’t have any truly unique mechanics. One of the things it does is summon enemies and shields, which is why this boss is a DPS check of sorts. Your team needs to deal a ton of damage at small windows to quickly defeat this Genshin boss.
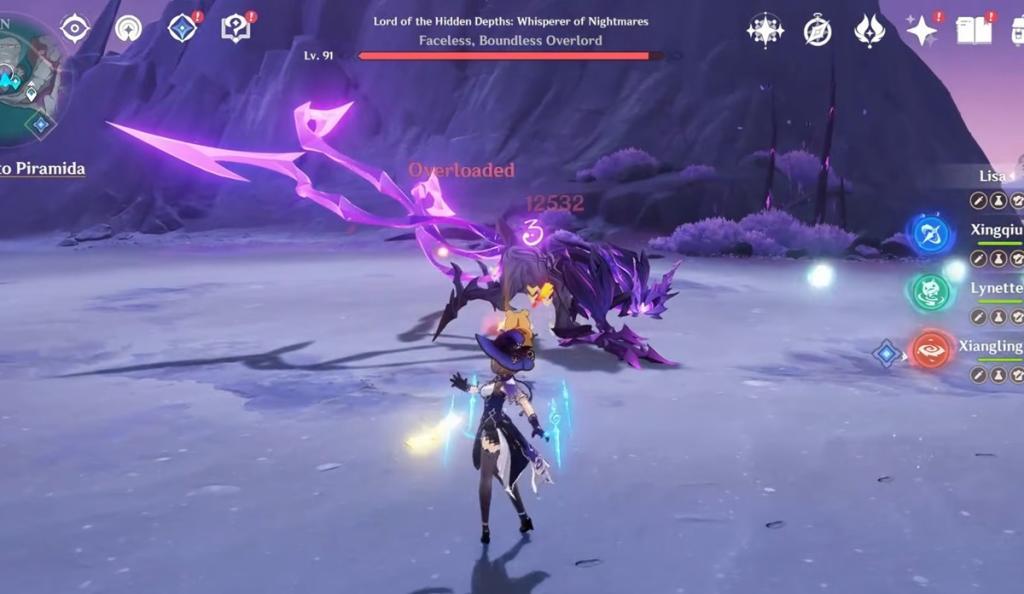
Lord of the Hidden Depths Whisperer of Nightmares is weak to Lunar reactions, so any Lunar reaction team should work against it. Other than that, any elemental reaction team also works, but to a lesser effect.
Best team comps for beating Il Dottore weekly boss
Il Dottore, the Heretic of the False Moon weekly boss from Genshin Impact’s Luna IV (6.3) update, favors teams that apply gradual DoT damage via Lunar reactions, Electro-Charged, or Hyperbloom to avoid triggering his high-damage resistance and healing mechanic after burst spikes. Shields and healers are essential for surviving Moonfall Impact AoE and Moonwither Realm chip damage. Flexible elemental spreads (Hydro, Dendro, Electro, Geo) maximize reactions against his Pyro-heavy kit.
Premium Lunar Teams
These leverage new Nod-Krai characters for optimal Lunar-Crystallize or Lunar Shard reactions.
| Main DPS | Sub-DPS/Support1 | Sub-DPS/Support2 | Healer/Shielder |
|---|---|---|---|
| Mauvika | Citlali | Xilonen | Bennett |
| Ineffa | Columbina | Flins | Sucrose |
| Nefer | Columbina | Lauma | Nahida/Kokomi |
| Zibai | Columbina | Illuga/Zhongli | – |
F2P-Friendly Teams
National variants or accessible 4-stars work well with reaction focus and shielding.
-
National (Bennett, Xiangling, Xingqiu, Rosaria): Pyronado and Rain Swords sustain Hydro/Pyro for Vaporize while Rosaria adds Cryo shields and Crit.
-
Overload (Noelle/Lisa, Xiangling, Fischl, Dendro Traveler): Shields block attacks; Overload and Burning clear adds without burst reliance.
-
Hyperbloom (Nahida, Shinobu, Furina, Zhongli): Gradual Dendro cores shred defenses safely.
Playstyle Tips
Rotate to maintain off-field application during his “Orders” phases and clones-avoid clustering for AoE safety. Exit Moonwither Realm portals if overwhelmed to reset pressure on Dottore directly. Prioritize Lunar enablers like Columbina for RES shred on his Pyro vulnerabilities.
F2P teams to beat Il Dottore
F2P teams excel against Il Dottore by focusing on gradual damage through reactions like Electro-Charged, Hyperbloom, or Overload, which avoid triggering his resistance and healing from burst spikes. Shields from accessible units like Noelle or Zhongli (if C0) help survive Moonfall Impact and arena hazards. National variants remain reliable due to their sustained application and healing.
National Variant
This classic setup uses Vaporize for steady DPS without heavy bursts.
| Main DPS | Sub-DPS | Sub-DPS/Support | Healer |
|---|---|---|---|
| Xiangling | Xingqiu | Bennett | Rosaria |
Hyperbloom Setup
Dendro cores from Nahida trigger consistent DoT safely.
| Applicator | Core Trigger | Hydro/Electro | Shielder |
|---|---|---|---|
| Nahida | Kuki Shinobu | Xingqiu | Zhongli |
Overload Reaction
Knocks back adds and clones while shielding through hits.
| Main DPS | Sub-DPS | Support | Shielder/Healer |
|---|---|---|---|
| Lisa/Fischl | Dendro Traveler | Xiangling | Noelle |
Rotation Tips
Apply elements off-field first (e.g., Xiangling Guoba, Fischl Oz) to build reactions before engaging clones or rifts. Dodge telegraphed AoEs sideways and prioritize portals to ignore the boss directly until weakened. Swap healers frequently during Moonwither Realm to counter chip damage.