Water floods the streets, the timer ticks down, and panic sets in as players scramble to survive the chaotic surge. In Steal a Brainrot Tsunami Mode, chaos meets strategy-where one bad move can mean getting swept away before you snatch the prize.
What Is Tsunami Mode in Steal a Brainrot?
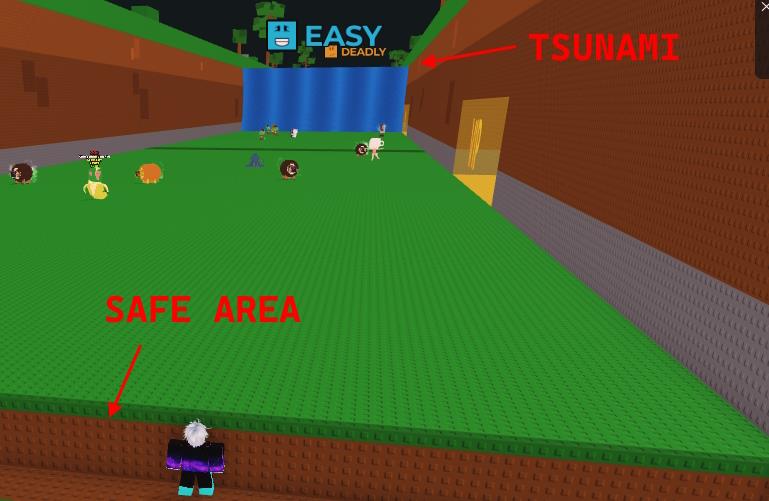
Tsunami Mode in Steal a Brainrot pits players against advancing waves on a linear field divided into rarity zones filled with Brainrots. Access it via the Escape Tsunami LTM NPC in the lobby, where stealing from bases shuts down completely. Grab higher-rarity Brainrots from farther zones, duck into gorges to dodge waves of rising speed and danger, then race back across the start line to claim them for base income.
Tsunami Mode in Steal a Brainrot is a limited-time survival event inspired by Escape Tsunami for Brainrots-style gameplay. Here is how the game Tsunami LTM mode works:
- Limited-time survival mode entered through the Escape Tsunami LTM machine.
- Stealing is disabled, and brainrots spawn in rarity-based zones from Common to OG.
- Players dodge Easy, Fast, Deadly, Secret, and mutation tsunamis with zone hiding spots.
- Speed upgrades can be purchased from the Speed Shop using cash or Robux.
- Gear, slaps, and VIP safety zones can be used to gain an advantage.
- Mutation tsunamis like Gold or Cursed affect zone rewards.
- A Secret tsunami and high-tier brainrot spawn every 15 minutes.
How to Play Steal a Brainrot Tsunami Mode
Players join a chaotic match where rising waves and unpredictable obstacles test their timing and movement. The goal is to grab the “brainrot” core before others while avoiding the incoming tsunami that floods the map in stages. Use sprinting, jumping, and quick routes to reach safe spots on higher ground. Items spawned across the area offer temporary boosts or traps to slow opponents. Survive longer than everyone else to claim victory and earn mode-exclusive rewards.
To play Steal a Brainrot Tsunami LTM mode, you must enter the special event lobby. To do so, follow these steps:
- Locate the Escape Tsunami LTM machine in the main Steal a Brainrot area.
- Interact with the machine by pressing the E key.
- Click the Join button to enter the Tsunami Mode lobby.

Learn the Zones
Each zone in Tsunami Mode represents a different brainrot rarity and risk level, with better rewards placed farther from safety. Understanding zone layout is key to surviving waves and reaching high-tier spawns.
- Zones range from Common to OG, with higher rarity zones being more dangerous.
- Cavities and gaps act as temporary safe spots from tsunamis.
- You can purchase VIP to hide in the side rooms as well.
Also Read: Steal a Brainrot Admin Machine Guide
Upgrade Speed
Speed upgrades are essential for surviving stronger tsunamis and reaching distant zones in time.
Best speed upgrades for surviving Secret tsunamis
For surviving Secret tsunamis, you want enough speed to safely reach high-tier zones right after the Secret wave passes, without losing control and overshooting safe gaps.
Target speed ranges for Secret waves
-
Aim for at least 140-150+ speed if your goal is to consistently reach Secret / very deep zones and get back before the next strong wave.
-
Many community guides and videos suggest 140 as the minimum for secret/celestial-level farming, with 200+ giving extra safety if you can control it.
-
A commonly recommended “comfortable” endgame target is around 200-230 speed, since it lets you cross long distances and still have time to drop into trenches before Deadly waves.
How to buy and structure upgrades
-
You purchase speed in the Speed Upgrade shop by standing in the cyan ring and buying +1, +5, or +10 steps with money or Robux.
-
Costs scale heavily; every 10 speed levels the price jumps again, and bulk (+5/+10) scales harder than +1, so don’t over-buy beyond what you actually need.
-
Because rebirthing fully resets your speed, only push speed to what you need for your next rebirth or for reaching the zone where Secret tsunamis become profitable.
“Best” upgrade pattern for Secret tsunamis
-
Upgrade in small bursts (for example 10-20 speed at a time), then run a few waves to test whether you can still accurately drop into gaps and react to turns.
-
Stop rushing upgrades once you comfortably:
-
Reach your desired Secret/late zone right after a wave passes.
-
Can always make it from one trench/safe spot to the next before Fast/Deadly waves.
-
-
If you start overshooting trenches or missing jumps, pause speed upgrades and focus on practicing pathing; high speed without control makes Secret waves more dangerous, not safer.
Practical recommendations
-
If you’re mid-game and only brushing against Secret waves, aim first for 120-150 speed and learn the timing.
-
Once you’re confident, push toward ~200-230 speed so you can capitalize on every 15-minute Secret tsunami cycle without risking wipes to Deadly waves.
Tell me your current speed and the highest zone you reach before dying, and I can give you a specific speed number to aim for next.
How to upgrade speed using cash and Robux efficiently
You upgrade speed efficiently in Escape Tsunami for Brainrots by treating cash and Robux as two different tools: cash for gradual progress, Robux only for big multipliers and convenience, not raw levels.
General rules for speed upgrading
-
Set clear breakpoints (for example 100, 150, 200 speed) and only spend to reach the next breakpoint, not random numbers.
-
Test your control after each 10-20 speed gained; if you start overshooting trenches, pause upgrades and practice movement instead.
Using cash efficiently
-
Buy speed mostly with in-game cash in small or medium steps (+1 or +5), because prices ramp up and you don’t want to overpay beyond your current goal.
-
Save cash between waves, then do “bulk” upgrades in one visit to the shop instead of constantly running back every time you can afford +1.
Using Robux efficiently
-
Avoid spending Robux on individual speed levels; those are the worst value long-term.
-
If you use Robux, prioritize:
-
Gamepasses that boost money/XP gain (you reach high speed cheaper with cash).
-
Permanent or long-duration training/earn-rate boosts over one-time stat bumps.
-
Balancing both
-
Early game: rely almost entirely on cash; use Robux only if you really want a money/XP pass that speeds everything up.
-
Mid/late game: push to the next meaningful breakpoint with cash, then consider Robux only for boosts that make farming faster so the next breakpoint is easier.
If you tell me your current speed, max zone, and whether you plan to spend any Robux at all, I can give you a concrete “spend this, skip that” plan.