Whispers echo through the forest as night falls and the caverns come alive. This guide to 99 Nights in the Forest on Roblox reveals hidden paths, rare resources, and survival tactics for those daring enough to explore the depths beneath the trees.
There are also very cool buffs that you can get from inside the cave, new enemies to fight off, and more. Here is a full guide to help you learn about the Cave in 99 Nights in the Forest.
How to Find the Cave in 99 Nights in the Forest
Head north from the spawn point past the three twisted oaks, then veer east along the river until you spot the fallen log bridge. Cross it carefully to avoid slipping into the water, and climb the rocky slope on the far side. The cave entrance hides behind a cluster of glowing mushrooms-clear them with your axe to reveal the opening. Mark this spot on your map for quick returns during night cycles.
The cave will appear at a random spot in the forest on Day 1. It won’t be too far from the campfire, and you can easily find it using the map. There will be a cave icon on the map with a yellow exclamation mark, denoting the main entrance of the cave.
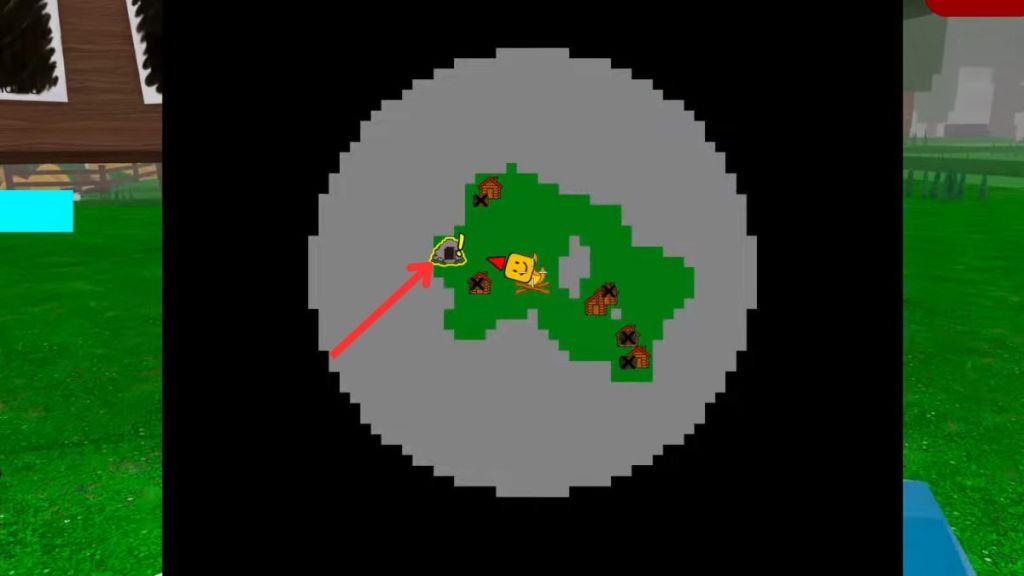
There are a total of four caves, with the other three being a smaller icon on the map compared to the main one. The smaller caves are scattered across the forest and can be unlocked once your campfire level has been upgraded. However, to access them, you need to blow them using the TNT given inside the cave.
How to Complete the Cave in 99 Nights in the Forest
Completing the Cave in 99 Nights in the Forest requires patience, observation, and steady progress through each chamber. Begin by gathering light sources and tools before entering, as visibility is limited and obstacles are frequent. Follow the glowing crystals along the walls to trace safe paths, avoiding unstable ground and sudden drops. Some sections contain hidden switches or pressure plates that open new routes, so explore carefully. Keep track of your stamina and inventory, since running out of supplies midway can force a restart.
Now that you have found the cave and its main entrance, it’s time to go in. But you need some preparations beforehand. To fully explore the cave without interruption, you need the following items:
- An Old Flashlight or a Strong Flashlight. We prefer the Strong Flashlight as it has more battery capacity and charges quickly.
- A Stew is a must so that you do not die of hunger. The more you have, the better chance you have at exploring. You can get a Stew from a Crock Pot by crafting.
- Some good weapons like Strong Axe, Chainsaw, Spear, Shotgun, etc. Get at least one or two of the strongest weapons, as you’ll face one of the toughest enemies inside the cave.
- Bandages and a Med Kit to revive your teammates.
- You can also use some of the best classes in 99 Nights in the Forest to make things easier.
Upon entering the cave, you’ll find a notice about the Bat in 99 Nights in the Forest, saying that take cover when it screams. After, you’ll be welcomed by some new green-cloaked Cultists, who are much, much stronger than the regular red-cloaked ones. Once you have killed them, look to your left, and you’ll notice a giant chunk of crystal.
There are plenty of Crystals inside the cave, which can be charged using the Flashlight. Charing them lights the entire area of vision, which can be crucial when exploring the cave and fighting cultists.
Also Read: 99 Nights in the Forest Codes (November 2025)
Right in front, you’ll find the bat chilling after injuring the deer. It will also attack you with its scream, so make sure to avoid it. Be careful when fighting the Bat, and make sure to dodge the supersonic screams.
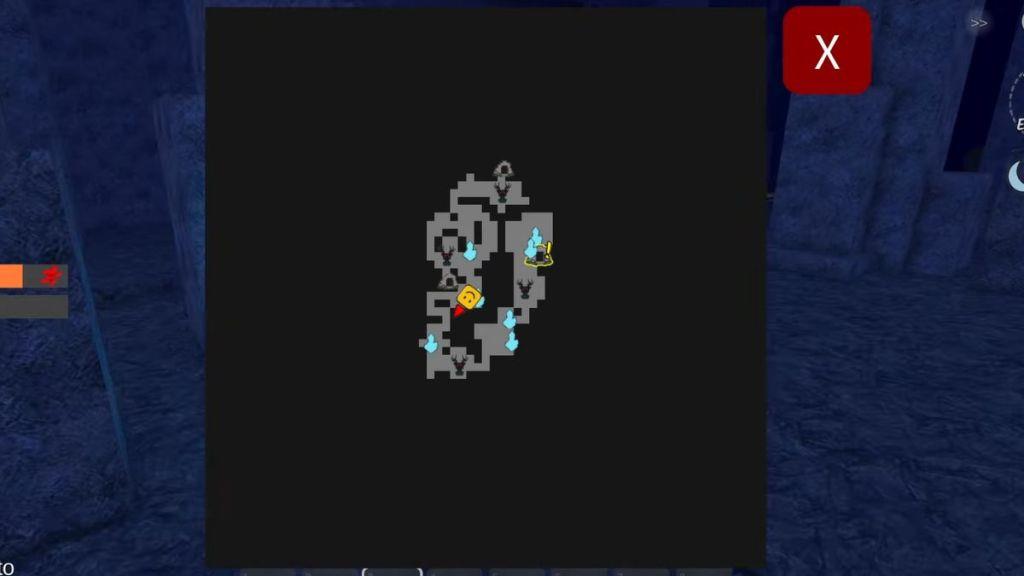
The cave can be pretty confusing, but luckily, you have a separate map for the 99 Nights in the Forest cave, which makes exploring a lot easier. We have fully explored the cave, and attached the map above. You can follow it and explore the cave if you are facing difficulties. The Blue Crystal icons are the charged Crystal, the Statues icons, which grant a Blessing when interacted with, and the Cave icons are the exits of the cave.
Make sure to keep your guards high, as there are a lot of enemies inside the cave that keep on respawning. Some of them gave me jump scares, and all of them are very chunky. They have a lot of health, and it would take a decade if you try to kill them using a bad weapon.
Aside from the green-cloaked Cultists, there is a new Cultist variant, with a cape, muscles, and an axe bigger than themselves. We died a few times on their hand, as they have a lot of health and deal a shit ton of damage. Also, do not forget to blast off the exits of the cave (found near the statues), so that you can come back later with more items, and continue exploring from where you left off.
All the Blessings in 99 Nights in the Forest
Embark on a moonlit journey where cavern walls whisper old tales, lantern light flickers along the winding paths, and every echo carries a blessing earned through patience, curiosity, and careful steps.
Unfortunately, there is no loot inside the cave, not even a single chest. However, four cool-looking Statues resemble the four monster entities in the game: Deer, Owl, Ram, and Bat. Each location will have two statues, providing blessings that will make your 99 Nights in the Forest gameplay a lot easier. You can choose only one statue at a time and select one blessing. Here is a list of all of them:
- Blessing of the Ram I: Decreases the chances of lightning
- Blessing of the Owl I: Decreases the chances of rain
- Blessing of the Deer I: Increases the day length and decreases night length.
- Blessing of the Bat I: Decreases hunger rate
- Blessing of the Ram II: Decreases the chances of lightning
- Blessing of the Owl II: Decreases the chances of rain
- Blessing of the Deer II: Increases the day length and decreases the night length.
- Blessing of the Bat II: Decreases hunger rate
How to defeat green cultists in the cave
Green (shadow) cultists in the Cave hit hard in groups, so the safest way to defeat them is to keep your distance, kite them in tunnels, and use high-damage or area-damage weapons instead of trading melee swings. Treat every pull like a mini-horde fight rather than a 1v1.
Positioning and movement
-
Fight them in narrow tunnels and doorways so only 1-2 can reach you at a time, backing up while you swing or shoot (classic kiting). Avoid open chambers where they can fully surround you.
-
Use corners and rocks as cover so you briefly peek to attack, then step back to reset their pathing and keep them clumped together.
Weapon choices
-
Prefer ranged and high-damage weapons (rifle, morningstar, similar late-game options) because shadow/green cultists are tankier than normal ones. Focus fire one target at a time to thin the group quickly.
-
When several are stacked, use AoE options (wide-arc melee swings, witch’s potion, laser-style weapons) to damage the entire pack and finish weakened ones as they approach.
Dealing with groups
-
Never underestimate them just because single hits are low; their attack rate and numbers can quickly overwhelm you if you stay still or get cornered. Pull small packs by edging forward and backing up instead of sprinting into a room.
-
If overwhelmed, retreat toward a previously cleared corridor, reload and heal while moving, then re-engage the front two cultists rather than turning to fight the entire group at once.
Best weapons for fighting cultists in caves
For fighting cultists in the caves, the best weapons are high-damage guns and strong melee options that can quickly kill tougher variants like Brute and armored cultists. Explosive and splash-damage weapons are especially useful because they hit groups and also break cave barriers.
Top primary weapons
-
Rifle: High single-target damage at range; great for quickly deleting Brute Cultists before they reach you, especially in long tunnels. Aim for headshots and kite backwards between shots.
-
Morningstar/other heavy melee: Recommended for Brute Cultists because its high base damage lets you finish them in only a few hits if you are comfortable playing close range.
Splash and explosive options
-
Explosive weapons and explosive ammo: The Caves Part 2 update added weapons and ammo that explode on impact, letting you damage tightly packed cultist groups and destroy rock barriers with the same shots. Use them when cultists are funneled in corridors for maximum value.
-
Any weapon with built-in splash (for example, laser- or cannon-style class weapons) works well in cave chokepoints, softening a whole wave so you can clean up survivors with rifle or melee.
Practical loadout tips
-
Run a ranged primary (Rifle or explosive weapon) plus one strong melee (Morningstar or similar) so you can snipe dangerous cultists at range and still defend yourself if they close the gap.
-
Prioritize upgrades and ammo for these weapons before a long cave push, since bulky enemies and confined spaces punish low damage and frequent reloads.